Guide to inserting a furniture family within an architectural project
Revit family
In this tutorial, we will continue to study the relationship between the parameters of the Revit family used as an example, the "Solo S62" chair and their operation within an architectural project.
Remember that the creation of the BIM object, commonly called families in Revit is essential for the completion of 3D BIM models and for their proper operation.
BIM objects are commonly searched on the Internet for inclusion in a design environment such as Revit Families without being in any way modified and often ignore the fundamental characteristics, how they were made, with which parameters, what purposes they must meet and what is the potential for interaction with 3D model under construction.
Differently from what happens with an Autocad “.dwg” File or a".ifc" File, a ".rfa" file (Revit BIM Families are ".rfa" files, Revit BIM Projects are ".rvt" files), when a "BIM Family" object is added to a project 3D Parametric Model, the latter is enriched with all the information contained within the inserted object that can, therefore, be interrogated, edited, accounted for, etc.
They are interior design objects such as chairs, tables, armchairs, and sofas, or real architectural models such as doors, windows, textures, and coatings etc. and, therefore, we need to know its characteristics to better exploit its potential and integration with the main BIM model that hosts them.
In the previous tutorial we focused on the operation of the Material and finishes types of parameters, we will now see how other parameters present in our furniture object have been created and how to use them in our project BIM environment.
In particular, we will focus on the "Identity Data" Parameter Type.

Revit - family parameters – identity data
This information, generally provided by the manufacturer of the furniture item, can be very useful to, for example, compile furniture abacuses or view the features within the project layout.
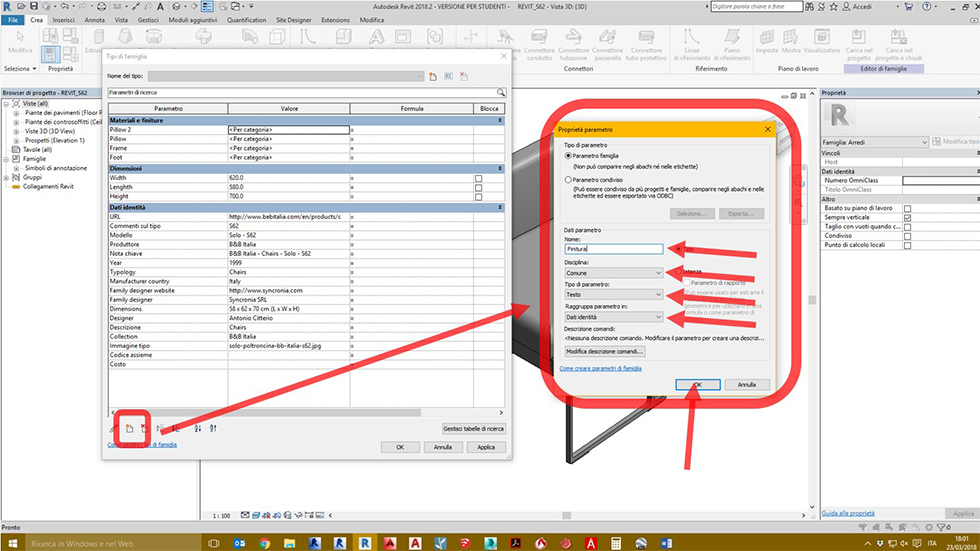
First, let's see how to create a new parameter:
- Click on the “new parameter” icon; enter the name of the new parameter to be assigned to the family (for example, “Finish”);
- From the "Discipline" drop-down menu select “Common”;
- From the "Parameter Type" drop-down menu, select “Text”;
- From the "Group parameter in" drop-down menu, select "Identity Data”.
Revit - family parameters – identity data 2
We have now created a new BIM Family parameter within the "Data Identity" type to which we will associate a corresponding value, for example, "Leather and brushed aluminium" taken from the manufacturer's specific Interior Design catalogue.
All "Identity Data" parameters of the downloaded Revit Family were created in a similar way.
Now we will see how this information can be exploited in a BIM project environment.
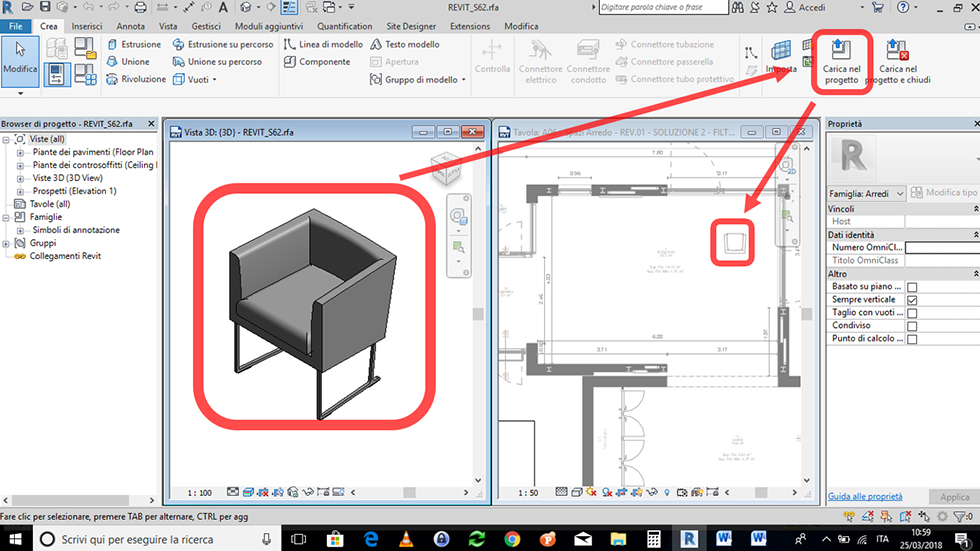
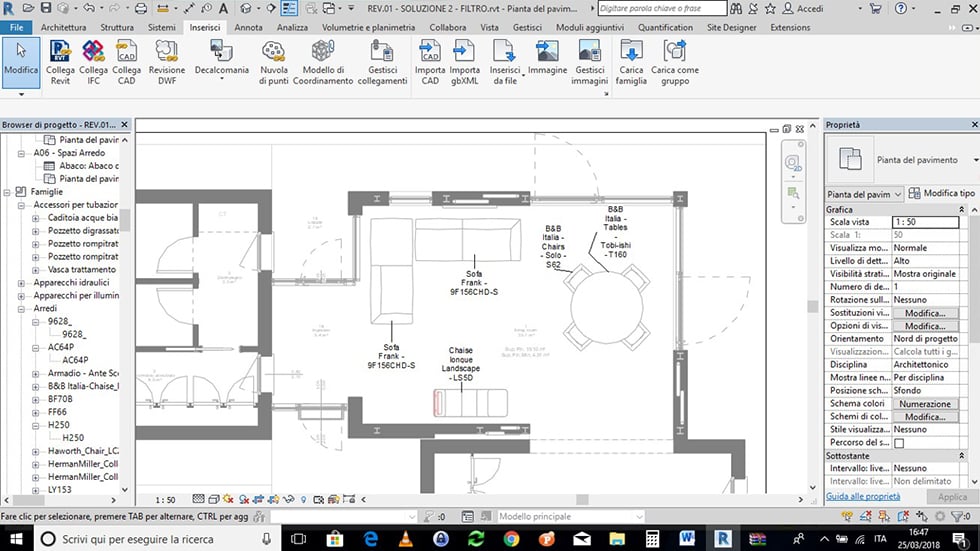
Suppose you need to set up a furniture solution within an already prepared 3D BIM model by uploading our 3D Object and positioning it in a plan view inside a room already labelled as such, for example, a "living room".
From the “Create” menu, select “Load into project” and use the mouse to place the chair inside the room chosen.
Revit – furniture family – adding to your project
Key note
Now we have the furniture BIM object inside a Revit project environment and we can verify the characteristics by simply selecting it as has been done before, and the information contained inside it, its parameters, can be interrogated and retrieved to properly itemize a furniture project through notes or creating specific abacuses.
Let's now see how to display an indication of findings.
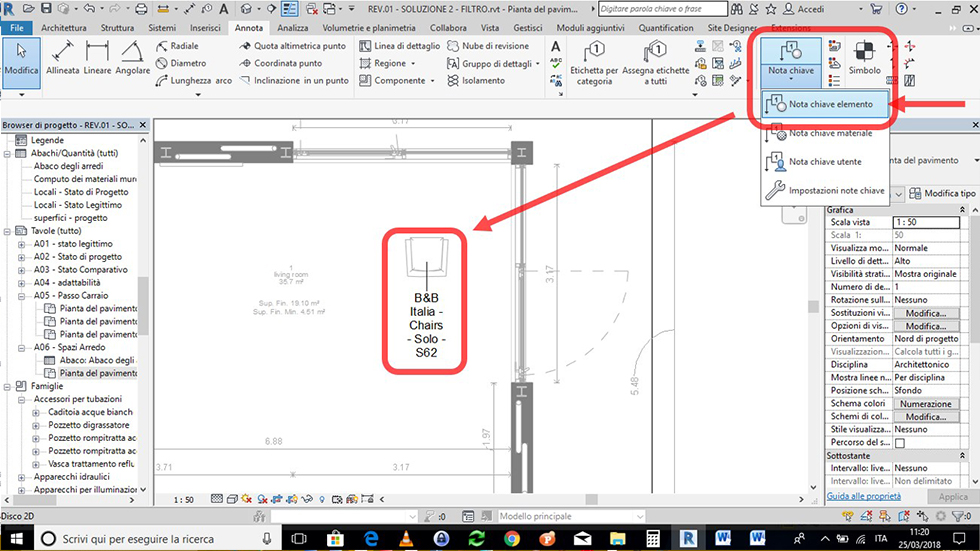
The easiest way is to assign a label to the piece of furniture through the use of the key note.
In a design environment, in “Note” found in the "Key note" drop-down menu, select the "Element key note" and then select our chair.
Revit – furniture family – keynote
Graphically you will see a note, which exactly refers to the "Key note" parameter text contained inside the selected Furniture family.
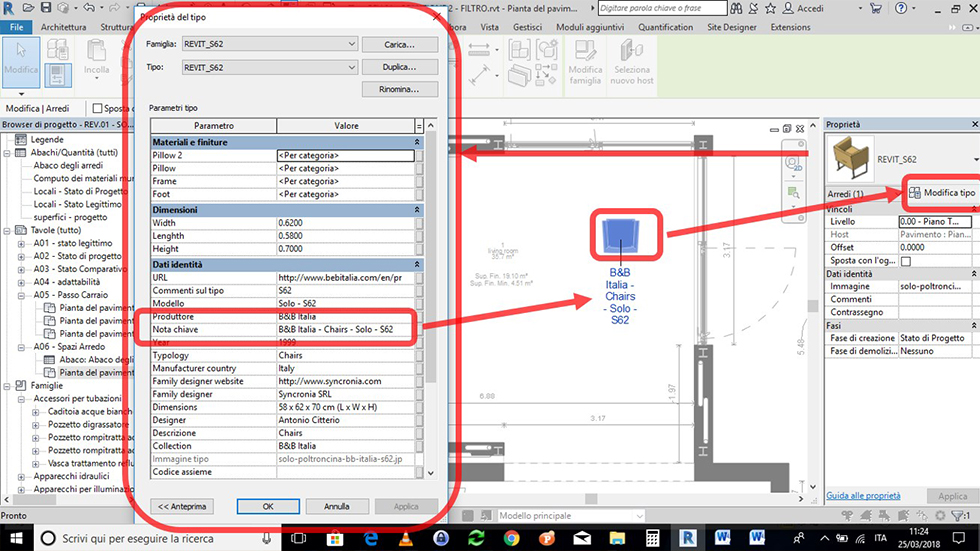
To verify this, select the Interior Design object, from the properties bar select "Edit type" and the menu of the properties of the imported 3D family type will open.
Revit – furniture family – Keynote 2
This is an example of how, in addition to performing a graph completion function, in this case of furniture, a Revit family contains a series of information and functions that allow to interact with the project 3D model that is intended to host it.
These parameters, which we have previously defined as the performance output of the Revit family, they can be retrieved at any time and in a different manner depending on the design requirements and within a BIM 3D Project.
Now we complete a furniture solution by downloading and inserting further Design objects such as:
- A table;
- One or more sofa elements;
- A chaise longue;
Etc.
We place families, elements of interior design inside the furniture project and, like before, we assign a label to the BIM object by using the key note.
Revit – furniture family – Keynote 3
Similarly to what was seen previously for the "chair" furniture item, we now have a note for the "sofa", "table" and "chaise longue" that exactly retrieves the text of the "Key note" parameter contained in the Furniture family.
Furniture abacus
Nel caso volessimo arricchire il nostro layout architettonico con ulteriori informazioni sugli elementi d’arredo, senza troppo appesantire la veste grafica è consigliato usare un abaco.
An abacus should be used if we want to enrich our architectural layout with additional information about the furniture items, but without weighing down the graphics.
Revit abacuses work like masks that contain and retrieve the parameters of the entire BM 3D model and, therefore, it is possible and in a very effective way to build one or more abacuses of furnishings that contain much more information on the furniture elements that can be added to an Architectural project.
In the project Browser, right-click on “Abacuses/Quantities” and select “New abacus/quantity
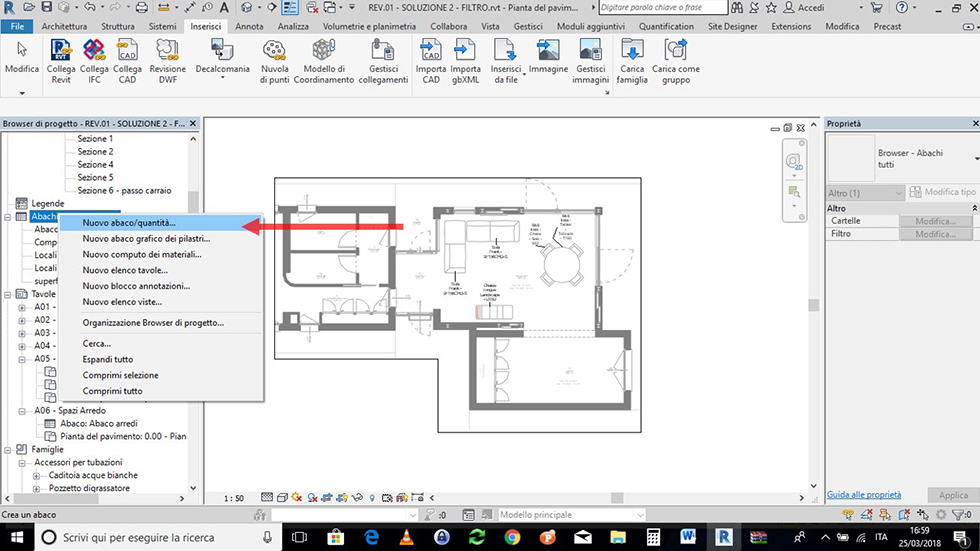
Furniture abacus - creation
Select "Furniture" from the next drop-down-menu
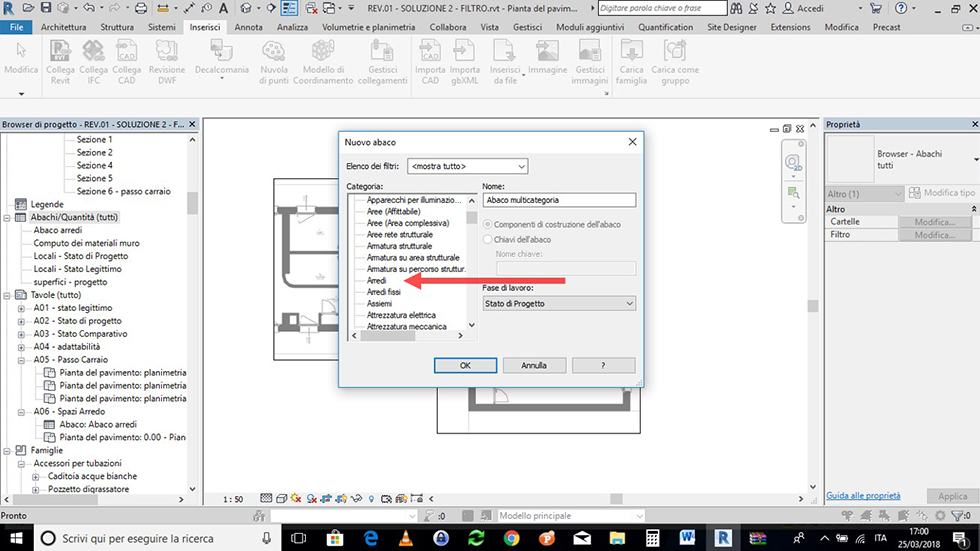
Furniture abacus - creation 2
The new mask that appears is the interface for creating the furniture abacus that we are setting.
On the left column we see the selectable fields, on the right we see the fields that we want to add to our table. These fields are the relationship between the parameters that exist within revit families and their reference (field) inside of the architectural project.
Proceed by entering only the “fields” needed to describe the individual Interior Design objects that make up our furnishing project. To help us correctly fill in the abacus, repeat what was done before, select one of the objects and with "Edit type" check which parameters are contained within the Revit families that we want to of Revit, and that we want to retrieve in our abacus.

Furniture abacus - creation 3
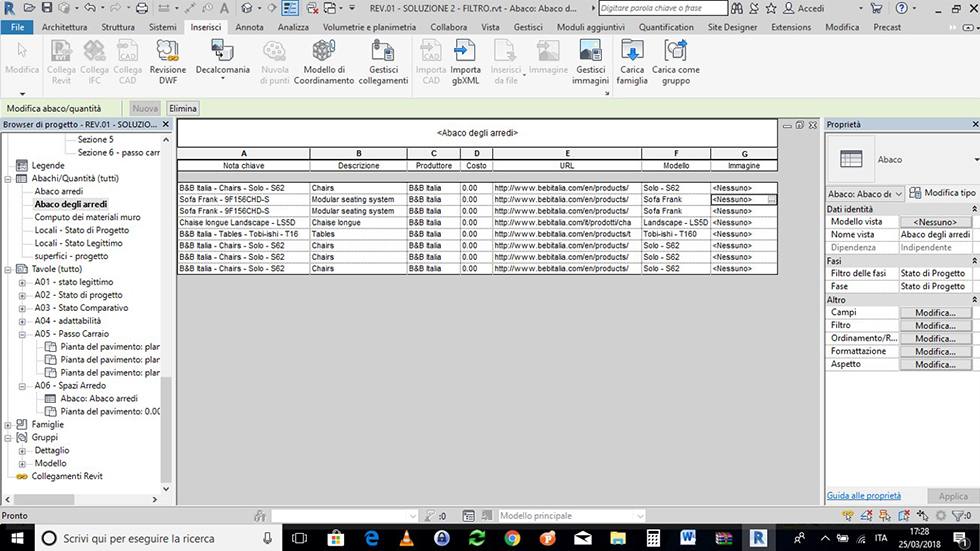
Select the following fields in the left column and with the green arrow add to the abacus (the red arrow removes the field from the abacus):
- Key note;
- Description;
- Manufacturer;
- Cost;
- URL;
- Model;
- Image.
Furniture abacus - creation 4
The abacus that is generated is a new view inside the project Browser and is presented as a table the columns and rows of which contain all the elements recognized as “Furniture” within the BIM Model.
The first field, “Key note” retrieves exactly what was viewed before within the plan view of the Architectural project, the other fields retrieves all the specific information (parameters) that have been retrieved. However, note how there are two fields with no information whatsoever, which are the “Cost” and "Image" fields.
In relation to the first, which is useful to estimate, and give immediate visual feedback of the cost of each item, we simply need to change each Furnishing family by adding a cost for each; returning to the plan view, select each individual interior design object with "Edit type" enter in the Revit family type properties and add an estimate or cost from the catalogue (the values inserted are purely indicative).

Furniture abacus - creation 5
The furniture abacus is now updated with the costs of the individual furniture items.
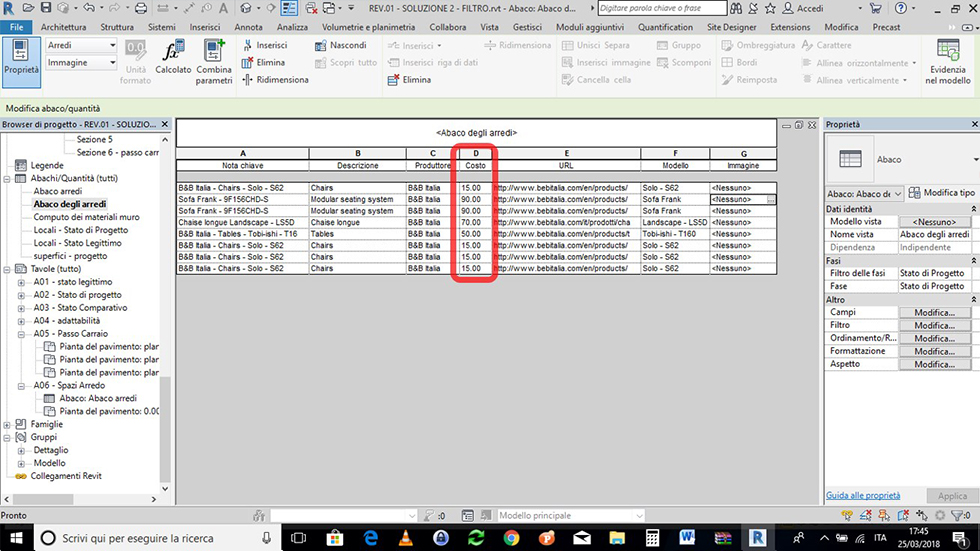
Furniture abacus – creation 6
In order to improve the graphics of the abacus, a preview of the furniture elements included in the Architectural project could be useful.
To do this you need to upload images (that can be downloaded at the same URLs) from the "Insert", "Manage images", "Add" menu from the manage tab that appears.
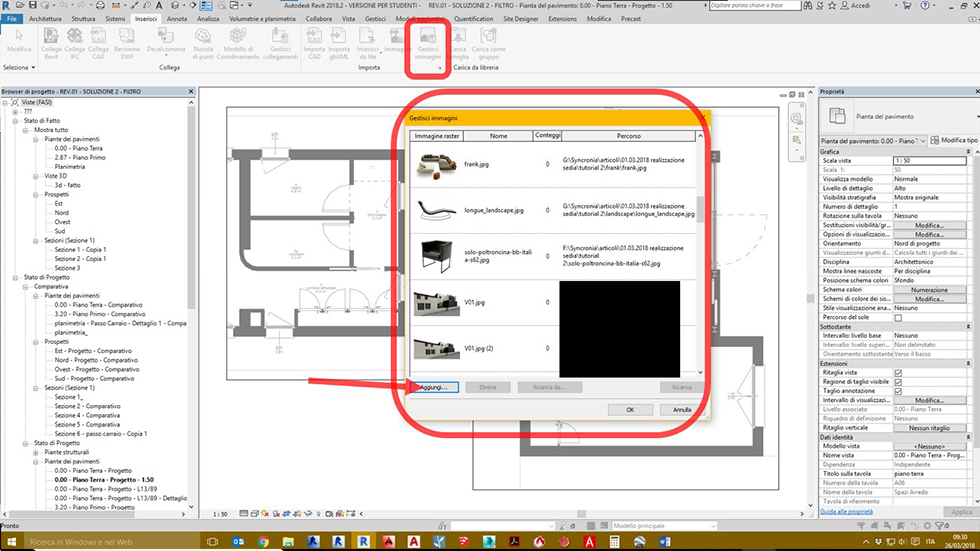
Furniture abacus – managing images 1
By returning to the "Furniture abacus" screen, it is possible to connect each Interior Design Element to its preview image by selecting the corresponding cell. Again the "Manage images" selecting will be displayed, select the image of the corresponding Furnishing and repeat the operation for all other chairs, tables, sofas, chaise longues found in the Architectural project.
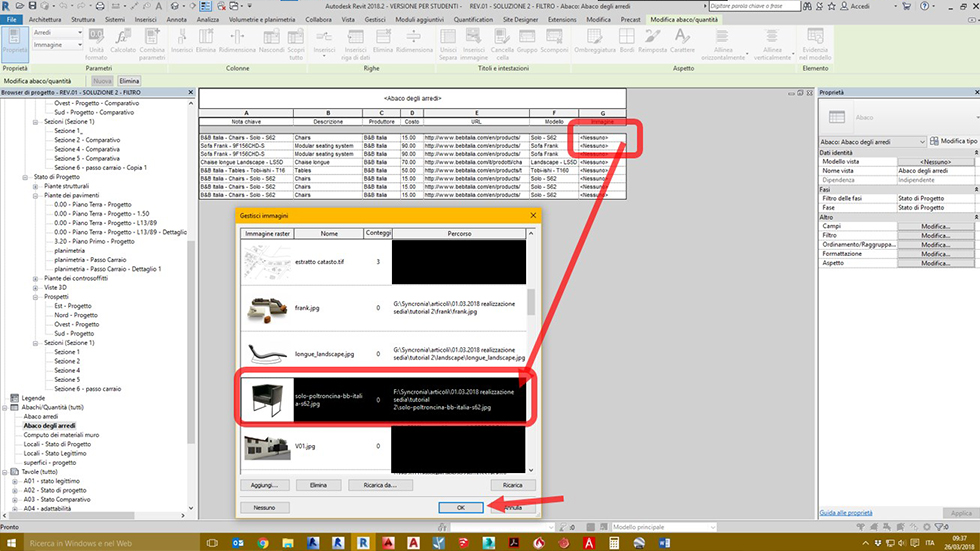
Furniture abacus - managing images 2
Now the furniture abacus has all preview images loaded.
To view them you need to, drag the “Furniture abacus" view inside a project table.
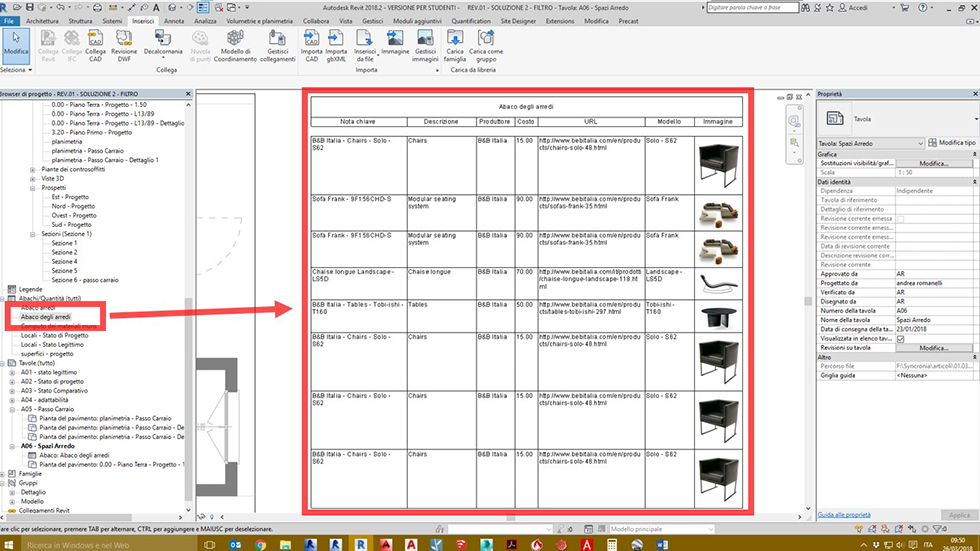
Furniture abacus - insertion into a project table