TUTORIAL 4: Revit family – introduction to the nested family

Introduction guide to the concept of the nested family applied to a set of furniture objects

Nested family 

In this tutorial we will start to introduce the concept of the nested family by uniting various furniture objects into a single parametric family, which as a performance output has a numeric variable in the number of objects of the same.


We are talking about the classic table example, with three, four or more chairs, but the concept can easily be applied to many other examples.

Remember that the creation of BIM objects, commonly called families in Revit is fundamental to complete the 3D BIM models and for their correct functioning.


BIM Objects are commonly searched on the Internet to be inserted in a Revit design environment as Family without being modified in any way and often ignore its fundamental characteristics, how they have been created, the parameters use, the objectives they must meet, and their potential for interaction with the 3D model under construction.


Unlike a ".dwg" file from Autocad, or a ".ifc" file, an ".rfa" file (Revit's BIM families are ".rfa" files, Revit's BIM projects are files ". rvt ") when a "BIM Family"object is inserted into a 3D Parametric Model of the project, the latter is enriched with all the information contained in the inserted object, which can therefore be interrogated, modified, accounted for, etc.

Whether they are interior design objects such as chairs, tables, armchairs, and sofas, or real Architectural models such as doors, windows, textures, and coatings, etc. Therefore, we need to understand the characteristics to better take advantage of the potential and integration with the main BIM model that will host them.
 

The numeric variable of the nested family

The nested family is a fundamental aspect in creating particularly complex objects.


BIM offers the possibility of enriching a project with multiple information, but this complexity to operate correctly without being redundant must be managed correctly: the Revit family must therefore be built according to specific rules to guarantee the final performance assigned.


One of the systems that underlie the construction of a complex Revit Family, is the concept of nesting (inserting), one or more families within another in order to simultaneously control the parameters and, thus, the final performances.

As always, the best thing is to exemplify, so we will dedicate this tutorial to the creation of a funiture piece, consisting of a table with chairs that as a functional output has the possibility of varying the seating number.

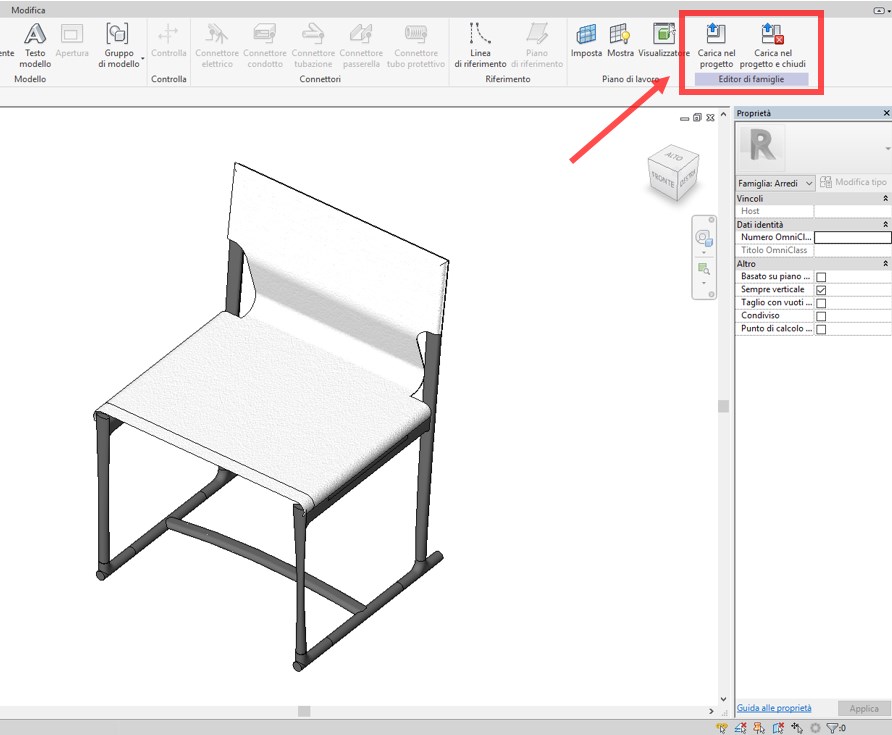
We will start by downloading two .rfa that have already been crated, or rather, one table and one chair.


1 imm

                                                                                       Revit – nested family – numeric variable 1


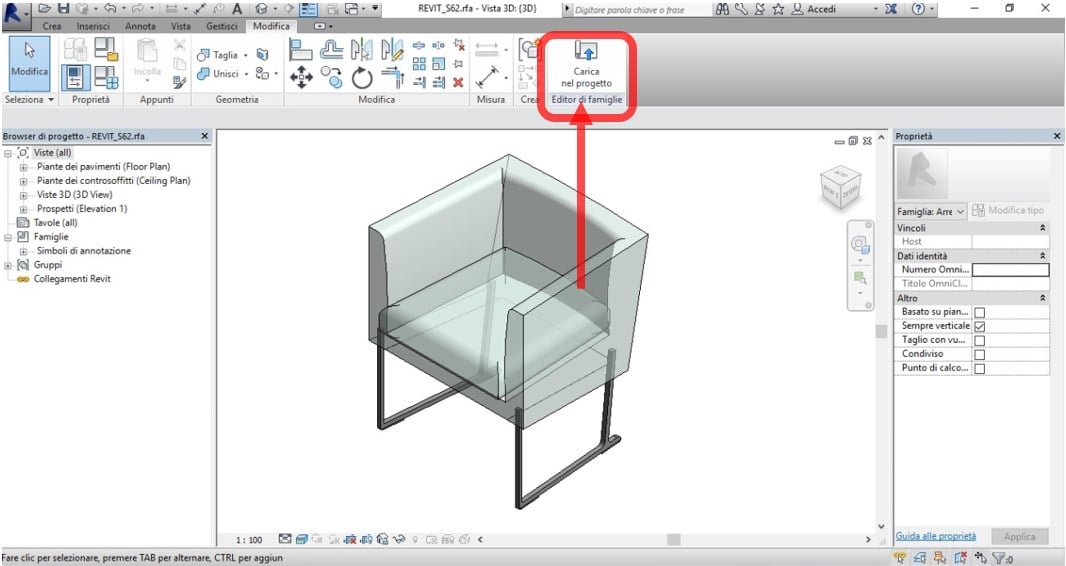
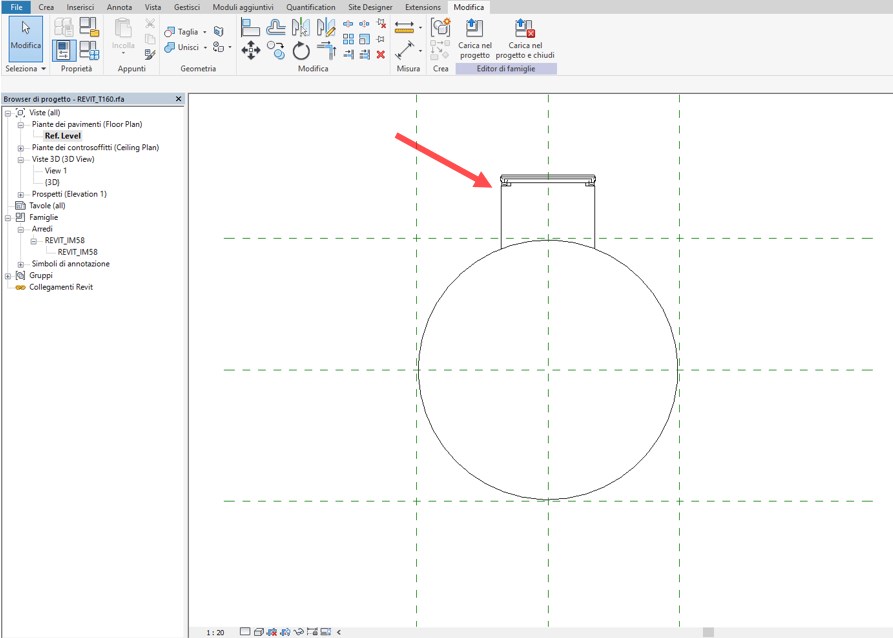
Let's open the two files at the same time and upload the IM58.rfa chair inside the T160.rfa table simply by selecting the first one and typing the command "load in the project" or "load in the project and close" if you want to close this family.

Place the chair inside the table view and switch to plan view.

The chair family is now nested inside the table family; therefore, in order to have a new family that is different from both of the native families, we will specifically save and rename it.
We align the chair to the table as if it were the first of a series of chairs that must be positioned around it.


2 imm

                                                                                     Revit – nested family – numeric variable 2


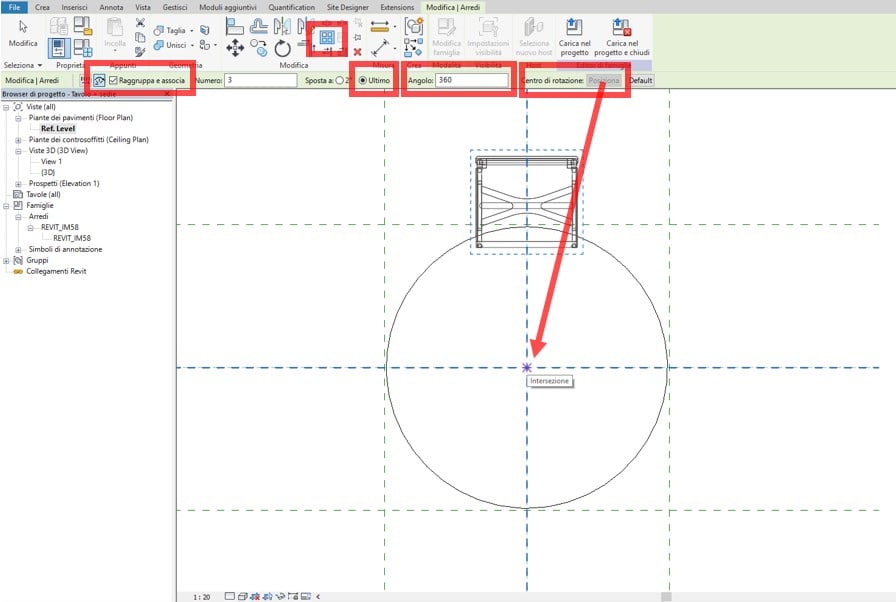
Now, we need to copy the chair in rotary motion around the center of the table, but the variable (parameter) that we have to insert is precisely the number of chairs we want to allocate to our furniture solution, therefore:

-    We will use the “Matrix” command from the Edit tab;
-    We will select “Radial” (since the repetition of the object must be circular);
-    We will keep “Group and associate” marked;
-    We will select “Last”;
-    We will position the centre of the rotation in correspondence to the table (intersection of the main plans);
-    We will type 360 in “Angle” and Send.


3 imm

                                                                                       Revit – nested family – numeric variable 3


This generates a radial matrix of the chair object in the 3 elements (given by default), which is displayed both inside the active function bar and along the generation line of the chair object copy path.


4 imm

                                                                                        Revit – nested family – numeric variable 4


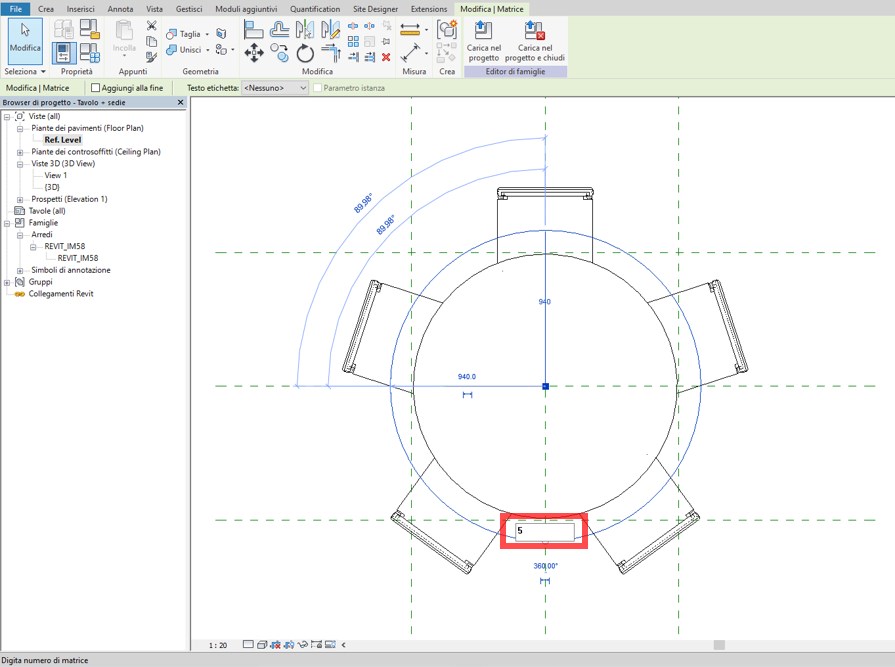
Leaving the open command, changing the number on the path we will change the number of chairs that generates the matrix around the table. We can say that the matrix command functions as a parametric grouping since it contains the already prepared numeric variable.

So, let’s try to increase the number of seats from 3 to 5.
We see that the matrix works properly. 
 

5 imm

                                                                                        Revit – nested family – numeric variable 5


We need to explain another detail. 
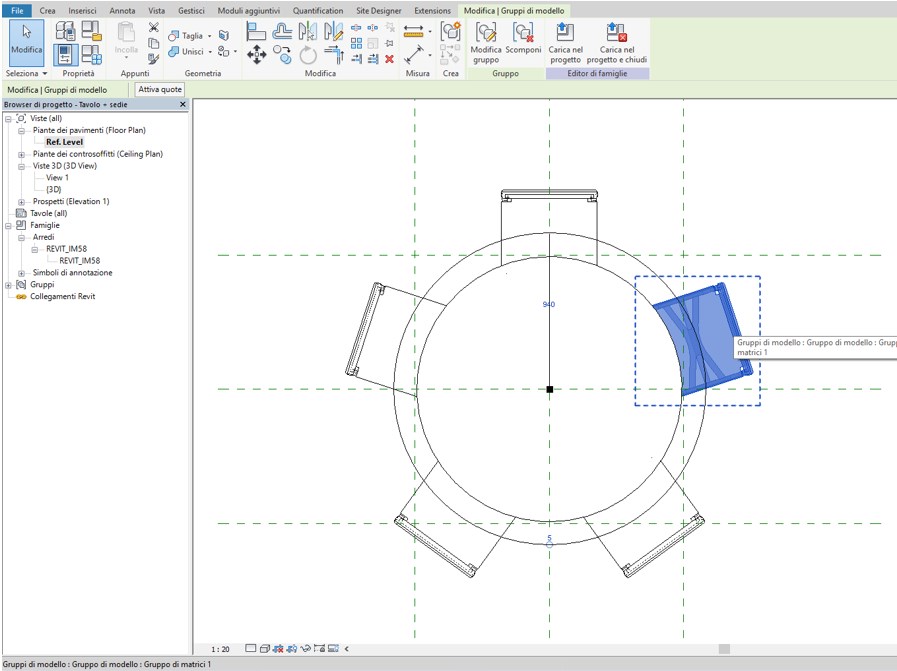
The chairs generated are part of a graphical parametric grouping (Matrix) and its behavior will be subject to the Matrix guidelines as long as it remains within this grouping. Therefore, this must not be modified.

This is graphically highlighted by selecting a single chair, which in addition to becoming blue will appear surrounded by a dotted line. 
 

6 imm

                                                                                          Revit – nested family – numeric variable 5 


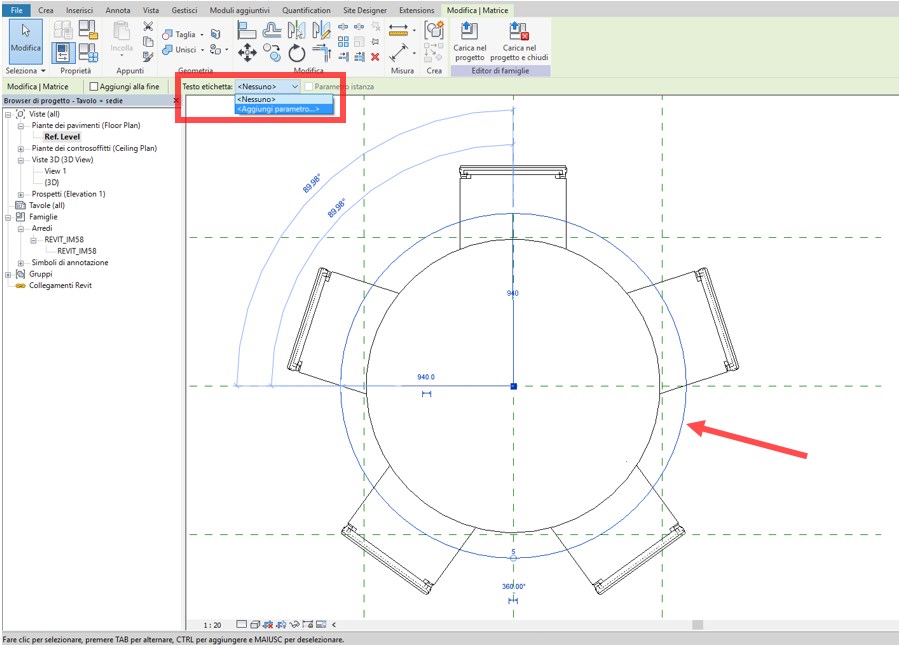
Now we must link the inherent property of the array command to generate a numeric variable of the objects to a parameter that will govern its operation (it will tell you how many chairs it will generate) and which must appear among the "Table + chairs" family properties.
The procedure is very simple and very similar to what we have seen previously for the creation of a new parameter:
               -    We will select the matrix path;
               -    We will select “Add parameter” from the “Label text” drop-down menu


7 imm

                                                                                         Revit – nested family – numeric variable 6


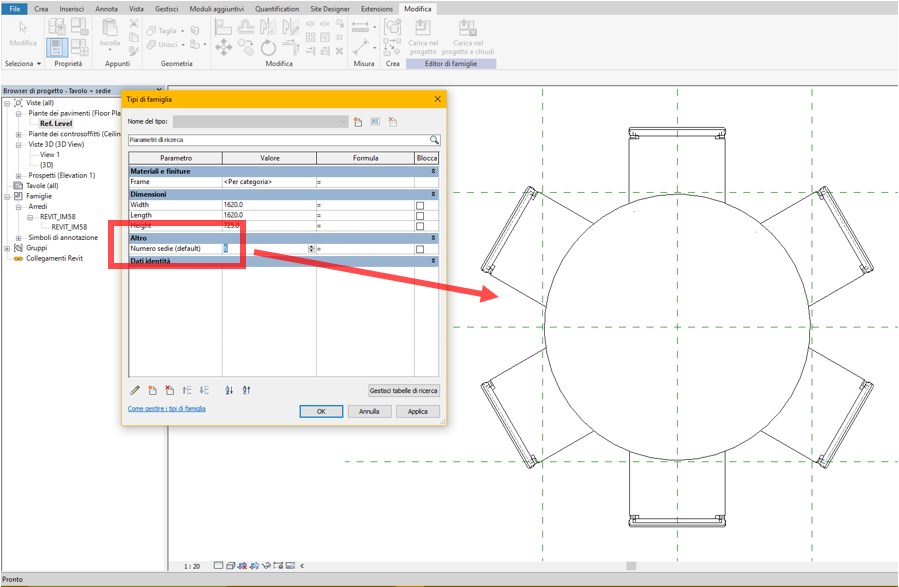
In the properties tab that appears, type the name of the new parameter, which we will call "Number of chairs".

We note that the fields "Discipline" but above all "Type of parameter" can not be changed, this is because the only variable that can be associated with the Matrix is an integer number.

In this specific case, it is important to select "Instance". This will allow us, as we will see later, to change the number of chairs in our family within a project environment, without having to access the type properties.


8 imm

                                                                                          Revit – nexted family – numeric variable 6


We can now verify that the new parameter "Number of chairs" has been generated and that it works correctly:
                   -    We access the “Family Type” menu from the “Properties” tab;
                   -    We check that the new parameter is correctly grouped in “Other”;
                   -    We try to change the number, for example from 5 to 6;


The association applied between the parameter and the matrix is correct, the performance output of the predetermined family is achieved.


9 imm

                                                                                         Revit – nested family – numeric variable 7


In conclusion, we try to insert our family within a design environment.

We select it and note that the parameter "Number of chairs" appears in the property bar.

As said before, having generated this parameter as “Instance”, this is can now be immediately changed without entering the type properties.
We will now try to change the number of seats, for example from 6 to 4 and let's see the result.
 

10 imm

Everything works correctly.

Technical staff Syncronia

Tutorial

TUTORIAL 2: Revit family – The 3D BIM furniture project in the project.

Guide to inserting a furniture family within an architectural project


 Revit family 

In this tutorial, we will continue to study the relationship between the parameters of the Revit family used as an example, the "Solo S62" chair and their operation within an architectural project.


Remember that the creation of the BIM object, commonly called families in Revit is essential for the completion of 3D BIM models and for their proper operation.


BIM objects are commonly searched on the Internet for inclusion in a design environment such as Revit Families without being in any way modified and often ignore the fundamental characteristics, how they were made, with which parameters, what purposes they must meet and what is the potential for interaction with 3D model under construction.


Differently from what happens with an Autocad “.dwg” File or a".ifc" File, a ".rfa" file (Revit BIM Families are ".rfa" files, Revit BIM Projects are ".rvt" files), when a "BIM Family" object is added to a project 3D Parametric Model, the latter is enriched with all the information contained within the inserted object that can, therefore, be interrogated, edited, accounted for, etc.


They are interior design objects such as chairs, tables, armchairs, and sofas, or real architectural models such as doors, windows, textures, and coatings etc. and, therefore, we need to know its characteristics to better exploit its potential and integration with the main BIM model that hosts them.


In the previous tutorial we focused on the operation of the Material and finishes types of parameters, we will now see how other parameters present in our furniture object have been created and how to use them in our project BIM environment.


In particular, we will focus on the "Identity Data" Parameter Type.

pic 1

                                                                                                            Revit -  family parameters – identity data

This information, generally provided by the manufacturer of the furniture item, can be very useful to, for example, compile furniture abacuses or view the features within the project layout. 


First, let's see how to create a new parameter:


-    Click on the “new parameter” icon; enter the name of the new parameter to be assigned to the family (for example, “Finish”);
-    From the "Discipline" drop-down menu select “Common”;
-    From the "Parameter Type" drop-down menu, select “Text”;
-    From the "Group parameter in" drop-down menu, select "Identity Data”.

pic2

                                                                                                                 Revit -  family parameters – identity data 2

We have now created a new BIM Family parameter within the "Data Identity" type to which we will associate a corresponding value, for example, "Leather and brushed aluminium" taken from the manufacturer's specific Interior Design catalogue.


All "Identity Data" parameters of the downloaded Revit Family were created in a similar way.


Now we will see how this information can be exploited in a BIM project environment.


Suppose you need to set up a furniture solution within an already prepared 3D BIM model by uploading our 3D Object and positioning it in a plan view inside a room already labelled as such, for example, a "living room".


From the “Create” menu, select “Load into project” and use the mouse to place the chair inside the room chosen.

pic3

                                                                                                                Revit – furniture family – adding to your project

Key note

Now we have the furniture BIM object inside a Revit project environment and we can verify the characteristics by simply selecting it as has been done before, and the information contained inside it, its parameters, can be interrogated and retrieved to properly itemize a furniture project through notes or creating specific abacuses.


Let's now see how to display an indication of findings. 


The easiest way is to assign a label to the piece of furniture through the use of the key note.


In a design environment, in “Note” found in the "Key note" drop-down menu, select the "Element key note" and then select our chair.

pic4

                                                                                                                           Revit – furniture family – keynote

Graphically you will see a note, which exactly refers to the "Key note" parameter text contained inside the selected Furniture family. 


To verify this, select the Interior Design object, from the properties bar select "Edit type" and the menu of the properties of the imported 3D family type will open.

pic5

                                                                                                                           Revit – furniture family – Keynote 2

This is an example of how, in addition to performing a graph completion function, in this case of furniture, a Revit family contains a series of information and functions that allow to interact with the project 3D model that is intended to host it.


These parameters, which we have previously defined as the performance output of the Revit family, they can be retrieved at any time and in a different manner depending on the design requirements and within a BIM 3D Project.


Now we complete a furniture solution by downloading and inserting further Design objects such as:
-    A table;
-    One or more sofa elements; 
-    A chaise longue; 
Etc.


We place families, elements of interior design inside the furniture project and, like before, we assign a label to the BIM object by using the key note.

pic6

                                                                                                                               Revit – furniture family – Keynote 3


Similarly to what was seen previously for the "chair" furniture item, we now have a note for the "sofa", "table" and "chaise longue" that exactly retrieves the text of the "Key note" parameter contained in the Furniture family.  

Furniture abacus

Nel caso volessimo arricchire il nostro layout architettonico con ulteriori informazioni sugli elementi d’arredo, senza troppo appesantire la veste grafica è consigliato usare un abaco.

An abacus should be used if we want to enrich our architectural layout with additional information about the furniture items, but without weighing down the graphics.


Revit abacuses work like masks that contain and retrieve the parameters of the entire BM 3D model and, therefore, it is possible and in a very effective way to build one or more abacuses of furnishings that contain much more information on the furniture elements that can be added to an Architectural project.


In the project Browser, right-click on “Abacuses/Quantities” and select “New abacus/quantity
 

pic7

                                                                                                                                                  Furniture abacus - creation

Select "Furniture" from the next drop-down-menu

pic8

                                                                                                                                                Furniture abacus - creation 2

The new mask that appears is the interface for creating the furniture abacus that we are setting.


On the left column we see the selectable fields, on the right we see the fields that we want to add to our table. These fields are the relationship between the parameters that exist within revit families and their reference (field) inside of the architectural project.


Proceed by entering only the “fields” needed to describe the individual Interior Design objects that make up our furnishing project. To help us correctly fill in the abacus, repeat what was done before, select one of the objects and with "Edit type" check which parameters are contained within the Revit families that we want to of Revit, and that we want to retrieve in our abacus. 

pic9

                                                                                                                                              Furniture abacus - creation 3

Select the following fields in the left column and with the green arrow add to the abacus (the red arrow removes the field from the abacus):
-    Key note;
-    Description;
-    Manufacturer;
-    Cost;
-    URL;
-    Model;
-    Image.

pic10

                                                                                                                                                Furniture abacus - creation 4

The abacus that is generated is a new view inside the project Browser and is presented as a table the columns and rows of which contain all the elements recognized as “Furniture” within the BIM Model.


The first field, “Key note” retrieves exactly what was viewed before within the plan view of the Architectural project, the other fields retrieves all the specific information (parameters) that have been retrieved.  However, note how there are two fields with no information whatsoever, which are the “Cost” and "Image" fields.


In relation to the first, which is useful to estimate, and give immediate visual feedback of the cost of each item, we simply need to change each Furnishing family by adding a cost for each; returning to the plan view, select each individual interior design object with "Edit type" enter in the Revit family type properties and add an estimate or cost from the catalogue (the values inserted are purely indicative). 
 

pic11

                                                                                                                                                  Furniture abacus - creation 5

The furniture abacus is now updated with the costs of the individual furniture items.

pic12

                                                                                                                                                 Furniture abacus – creation 6

In order to improve the graphics of the abacus, a preview of the furniture elements included in the Architectural project could be useful.


To do this you need to upload images (that can be downloaded at the same URLs) from the "Insert", "Manage images", "Add" menu from the manage tab that appears.

pic13

                                                                                                                                    Furniture abacus – managing images 1

By returning to the "Furniture abacus" screen, it is possible to connect each Interior Design Element to its preview image by selecting the corresponding cell. Again the "Manage images" selecting will be displayed, select the image of the corresponding Furnishing and repeat the operation for all other chairs, tables, sofas, chaise longues found in the Architectural project.


pic14

                                                                                                                                Furniture abacus - managing images 2

Now the furniture abacus has all preview images loaded.
To view them you need to, drag the “Furniture abacus" view inside a project table.

pic15

                                                                                                                  Furniture abacus - insertion into a project table

Tutorial

¿ Espacio BIM ?

¿Todavía no conoces Espacio BIM? Se trata de una empresa que presta tanto servicios en el ámbito de la consultoría como formación e-learning en entornos BIM, VR (Realidad Virtual), AR (Realidad Aumentada) y MR (Realidad Mixta). Además, cuenta con el respaldo de Autodesk y Chaos Group puesto que es ATC o Authorized Training Center para ambos casos. Así mismo, en Espacio BIM cuentan con un gran abanico de profesionales experimentados en metodología BIM, así como en VR, AR y MR.

Consultoría BIM, y VR, AR y MR

El área de Consultoría BIM, y VR, AR y MR de Espacio BIM, cuentan con un gran abanico de servicios: y es que a día de hoy, son la única consultora especializada en metodología BIM, y Realidad Virtual, Realidad Aumentada y Realidad Mixta. Prueba de ello son los trabajos llevados a cabo en el sector AEC (Arquitectura, Ingeniería y Construcción): Implantación BIM en promotoras, constructoras, estudios de arquitectura...; Consultoría BIM para gestión de activos; O creación de recorridos virtuales y nube de puntos entre otros. Aquí te dejo algunos ejemplos de los trabajos realizados en Consultoria BIM, y VR, AR y MR.

BIM Software Store

Para acercar a un precio más competitivo plugin y software BIM a las empresas con las que trabaja, Espacio BIM ha creado BIM Software Store. ¿Quieres comparar y comprar software BIM al mejor precio? ¡Échale un vistazo!

Máster y Cursos BIM y de Realidad Virtual Online

Como ya sabes, Espacio BIM además cuenta con una gran variedad en su oferta formativa. En ella, te ofrecen cursos y máster BIM, VR, AR, y MR que se adaptan a las diferentes disciplinas y necesidades de tu perfil profesional de una forma dinámica. ¿Y qué es una formación online sin un equipo que respalde cada paso que des? En Espacio BIM lo tienen muy claro, y es que cuentan con un conjunto de técnicos que te ayudan en cada duda, consulta o ejercicio que se te plantee. Pero, ¿qué es lo que te ofrece esta formación online?

  • Certificación. Espacio BIM es ATC (Authorized Training Center) tanto de Autodesk como Chaos Group.
  • Sin horarios. Todos los máster y cursos BIM, VR, AR y MR son online y puedes acceder a todo el contenido cuando desees.
  • Independientemente de la formación -cursos o máster- que adquieras, te dan un año completo de acceso. ¿No es genial?
  • Variedad en el contenido. Infografías, masterclasses en vídeo, y todo tipo de recursos complementarios.
  • Desde cualquier dispositivo. Accede a todo el contenido e información sin preocuparte de tener un ordenador a mano.
  • Seguimiento personalizado. El equipo técnico profesional te resuelve todas tus dudas y evalúa tus colaboraciones en menos de 24 horas.
  • Completamente bonificable. Cuentas con la opción de bonificar íntegramente la formación a través de tu empresa.

¿Quieres saber más? Puedes echar un vistazo a su Curso Revit gratis de introducción a Autodesk Revit Architecture, o a los Master BIM que proponen.

"Me considero exigente y práctica y he encontrado en este equipo de enseñanza la respuesta perfecta para aprender de manera eficaz y ajustada la metodología BIM. La accesibilidad y resolución de dudas es inmediata y muy profesional. Lo recomiendo sin dudarlo y seguro que ampliaré mis conocimientos con ellos." Lucía Requena


Tutorial

TUTORIAL 3: Revit family – the abacus of furniture in the project

Guide for the creation of a "furniture abacus" view to be included within an architectural project 


Revit family

In this tutorial, we will continue to study the relationship between the parameters of the Revit family used as an example, the "Solo S62" chair and how they work within an architectural project.


Remember that the creation of BIM objects commonly called families in Revit is essential for the completion of 3D BIM models and their proper functioning.


The BIM Objects are commonly searched for on the Internet so that they can be included in a Revit design environment as Families without being modified in any way and will often ignore the fundamental characteristics, how they were made, with what parameters, what purposes they must fulfil, and what is the potential interaction with the 3D Model in construction.


Differently from what happens with a “.dwg” file in Autocad, or a “.ifc” file, a “.rfa” file (the Revit BIM Families are ".rfa" files, Revit BIM Projects  are ".rvt" files), when a "BIM Family" object is inserted in a Design Parametric 3D Model, the latter is enriched with all the information contained in the inserted object that can, therefore, be interrogated, edited, accounted for, etc.


They are interior design objects such as Chairs, tables, armchairs, and sofas, or real architectural models like doors, windows, textures, and coatings, etc. and, therefore, we need to know their characteristics to exploit better the potential and integration with the main BIM model that hosts them.


In the previous tutorial we saw how, in addition to performing a graphic completion function, a Revit family contains a series of information and functions that allow it to interact with the 3D model of the project that is intended to host it, these parameters, which we have previously defined as the output performance of the Revit family, may be retrieved at any time and in a different manner depending on the design requirements and within a BIM 3D project.


In particular, we have obtained a “Furniture abacus" that can be inserted into a project table containing a lot of information on the furniture items included in the BIM model.

tutorial 3 pic 1

                                                                                    Revit - furniture abacus – adding it to the project table

Furniture abacus

Now we will discuss the relationship between the parameters that exist within Revit families, and their retrieval (field) inside the architectural project graphically represented by the abacus.


We need to remember that Revit abacuses work like masks that contain and retrieve within them the parameters not only of some parametric families imported into the project but of the entire BIM 3D model, and therefore it is possible to combine and graphically retrieve fields that put into related parameters belonging to different objects.


The most immediate example that can be made in this regard is the compilation of an abacus, which in addition to providing a list of furnishings found throughout the model, provides more accurate and up-to-date information of the architectural design environment in which each specific furniture element is inserted.


A classical breakdown of furniture per room.
To do this, we need to complete the furniture by downloading and putting into distinct rooms further Design objects such as:
-    a bed; an armchair
-    a table
-    a chair; etc.


We place families, interior design elements, in the furniture project into distinct rooms such as the Living Room, Kitchen, and Bedroom, and give the BIM object a label by using the key note.

tutorial 3 pic 2

                                                                                                                         Furniture project – breakdown of rooms

As done previously, our furniture abacus is updated automatically.


We connect the new Interior Design Elements to their preview image by selecting the corresponding cell. The "Manage images" selector is displayed, select the image of the corresponding furniture and repeat the operation for any other new furnishing object present in the Architectural project.

tutorial 3 pic 3

                                                                                                       Furniture abacus - managing the preview image

Returning to our project table, we will have a view of the updated abacus.

tutorial 3 pic 4

                                                                                                     Furniture abacus - adding to project 1 table

Now, to group the furniture into rooms, different categories compared to those so far displayed need to be entered into the abacus using the same procedure.


Returning to the Abacus view of the furniture that can be selected in the project browsers, select "Fields" from the property bar of the screen and then select Room in the available fields of the property mask

tutorial 3 pic 5

                                                                                                          Furniture abacus - inserting Room fields

In this way, the fields are now selectable for the enrichment of our abacus furniture can be taken also from the Local category, this means that our new table will be composed by the fields that belong to the elements of the model different, but that interact between them.


Therefore, we can retrieve information from parameters of different elements into a single abacus.


Therefore, we add the following fields from the selector:
-    Room: Name
-    Room: Number
-    Room: Floor

tutorial 3 pic 6

                                                                                                               Furniture abacus - inserting Room 2 fields

We check the obtained result in the project table.

tutorial 3 pic 7

                                                                                                                Furniture abacus - inserting Room 3 fields

As we can see each object contains, in addition to the information that retrieves the parameters inherent in the imported family, even where the same is located inside the project and, more precisely, the name and number of the room hosting the object and the building floor (level) where it is inserted.


In a similar way to what has been done up to now, you can insert additional fields and cross-reference to other parameters.


You can also intervene to sort/group the abacus to make it more readable, and, in particular, to eliminate the repetition of items.


From the properties menu of the “Furniture abacus" menu, sort by "key note" and uncheck the “List all instances”.

tutorial 3 pic 8

                                                                                                                          Furniture abacus - sorting/grouping

In this way, we obtain a cleaner table view without repetitions of images.

tutorial 3 pic 9

                                                                                                                      Furniture abacus - sorting/grouping 2

Shifting, filtering, or formatting repetitive or unnecessary fields can further refine the abacus.


For example, you can hide the key note field (column) since the same information is repeated and grouped together in the footer of each row, by selecting “Format” from the Properties menu of the Abacus and then approve the “Hidden field” for the “Key note”.

tutorial 3 pic 10

                                                                                                                                  Furniture abacus - formatting

Now the furniture abacus has a clear and legible graphic look that is free of repetitive fields and with clear information. 


We note that every element of the furniture is grouped, counted and added to the “key note" field. 

tutorial 3 pic 11

                                                                                                                             Furniture abacus - sorting/grouping 3

In fact, the “Mirto Indoor – IM58” chair model is present for No. 6 units, all on the ground floor, and more precisely in the kitchen.


While the “Only – S62” chair is present for No. 4 units on the ground floor but inside the living room.


Now let's try and move some of these items on other floors or the rooms of the project to verify that the abacus works properly.


For example, we place two other Mirto chairs on the first floor and another Solo chair in the kitchen on the ground floor.

tutorial 3 pic 12

                                                                                                              Furniture project – the breakdown of rooms 2

We verify to see if our Furniture Abacus has changed again n the project table.

tutorial 3 pic 13

                                                                                                                     Furniture abacus - sorting/grouping 4

We now have a double row for the "Mirto indoor – M58" chair that is divided into the kitchen on the ground floor (No. 6 chairs) and hallway on the first floor (No. 2 chairs).


As for the “Only – S62” chair, we correctly have No. 1 unit in the kitchen and No. 4 units in the living room all on the ground floor. 
We can say that the abacus is set up correctly and working.


In order to always have the cost of our furniture project under control, it is useful to add the sum of the costs of the individual items.


In the formatting field the calculation of the totals for each field can be easily applied; by applying to that of the costs we can see the price for the single item and the total estimate of our furnishing project at the same time.
 

tutorial 3 pic 14

                                                                                                                                    Furniture abacus – formatting 2

The changes made so far are just an example of how a Furniture abacus can be made. The result is only an example; there are many possibilities to combine the properties of the abacus to display the information according to the project needs.

tutorial 3 pic 15

                                                                                                       Furniture abacus - adding to project 2 table

It is a good practice to generate an abacus that contains all fields needed to present your project, then to duplicate it into multiple views and to each of them apply the various display rules.
 

Tutorial

TUTORIAL 1: Creating a 3D BIM furniture object with Revit.

Part 1

The creation of BIM Objects, commonly called families in Revit, is essential for the completion of 3D BIM models, and for their proper operation.

BIM Objects are commonly searched for on the Internet in order to be included in a Revit design environment as Families without being modified in any way, and we often ignore the fundamental features, how they were made, the parameters used, the purposes they must fulfil, and the potential interaction with the 3D Model in construction.

Differently from what happens with a “.dwg” file in Autocad, or a “.ifc”, “.rfa” (Revit BIM Families are ".rfa", Revit BIM Projects are ".rvt" files) when a "Bim Family" object is added to a project Parametric 3D Model, the latter is enriched with all the information contained within the inserted object that can, therefore, be interrogated, edited, accounted for, etc.

They are interior design objects, such as Chairs, tables, armchairs and sofas, or real Architectural models such as doors, windows, cladding etc. Therefore, we need to understand their features to better exploit the potential and integration with the main BIM model that hosts them.

This tutorial will show how to crate a Revit family and, in particular, a furniture 3D BIM object.

The easiest thing to do is start from one of the furniture Revit Families found on this website to understand how it was created.

Take, for example, a chair, and more precisely the "Solo S62" .rfa file https://www.syncronia.com/it/modelli-3d-bim-cad-sedie/bb-italia/solo

When opened, the "Chair" Furniture object file will look like this:

img

In addition to carrying out a completely graphic function, in this case of furniture, a Revit family has a series of information and functions that allow it to interact with the 3D model of the project that is intended to host it.

These information and functions are defined parameters and are the performance output of the family.

Each Revit Family will have specific parameters, the creation of which is much more complex than the realization of an Autocad Block.

If we take a Window or Door Frame as an example, you should have the opportunity to meet the Architectural solutions of the 3D BIM Project, but this will have to be designed to comply with such requests in the simplest way possible without having to be physically modified every time.

We need the parameters of a 3D BIM family for this purpose.  

Now let's take a look at the family parameters of Furniture as an example. Simply click on Family Types of the Properties tab of the Create menu.

img


The "Family Types" menu that opens provides all information about the Furniture family parameters.

In this case, we see that there are three types of parameters:

  • Materials and Finishes;
  • Dimensions;
  • Identity Data.

Within the first type we find the parameters of the Furniture BIM Family:

  • Pillow;
  • Frame;
  • Foot.

It is important to note that the Revit Family used as an example is a piece of Furniture, a Chair, for which the manufacturer provides a fixed size and materials that can be chosen from the catalogue.

The choice of the materials of the Chair is the design variable, which is controlled by the Revit family parameters.

Each of these parameters has a value that, if well set, and once the family is hosted within the BIM project model, can be changed with the purpose, as said above, of assigning a custom material to the BIM Furniture object and, in particular, to the pillow, rather than to the frame or to the foot of the chair.

To check if this is sufficient, click on the reference value for "Pillow" for example and assign a different material than that set by default to the "Chair" Furniture object. This material can be selected from the “Material Browser” available.

img

Now, everything in the Revit family corresponding to the “Pillow” is associated with a different material, for example a glass.

Then, we check what part of the furniture object has changed appearance.

img

It can be noted that both the seat cushion and the backrest of the Furniture item have actually changed the material, it is used to indicate that both are associated with the parameter “Pillow”.

Now we will see how the "Materials and Finishes" parameters are associated to the various part of the Revit family in question.

img

Selecting the chair backrest will activate the properties of the specific object, and in "Materials and Finishes" the "Glass" material is associated. Immediately to the right you will note a button.

This is the command to set the association of the material parameter to the geometric shape selected.

By selecting the button, you enter the association or creation menu of the material parameters of the Furniture BIM object taken as an example.

img

The parameter to which the furniture object geometry selected is associated, and we find the "Pillow" parameter of the "Materials and Finishes" type.

At this point, you can choose to associate the selection with another existing parameter (Foot or Frame), or create a new parameter, for the purpose of, for example, differentiating the material between the backrest and the seat of the Revit family.

To do this, select the "Add parameter" button and you will see the "Parameter Properties" menu in reference to the new parameter to create what we will call “Pillow 2”.

After the creation of the new parameter we check if the same appears among the family parameters. We go back and click on the Family Types of the Properties tab of the Create menu of the ".rfa" file.

img

As you can see, the new parameter “Pillow 2” is now present and positioned correctly within the type of f “Materials and Finishes” of our Chair.

At the same, we can assign a new material in the same way.

To check that our BIM family works properly, we need to upload it to a Revit file project:

  • Open a new project from the "R" drop-down menu and select "New"; "Project", "Architectural Model"

img

The new work environment presents itself as a blank floor plan.

img

  • From the "Switch windows" drop-down menu, return to the Revit family being created by selecting it from the open views.

img

  • Upload the chair furniture object in the project BIM model.
  • Now we have the furniture BIM object within a Revit design environment, and we can check it simply by selecting it.

img

In the properties toolbar, select the “Edit type” and properties menu of the imported 3D family type opens.

As a test, replace the materials associated with parameters “Pillow”, “Pillow2”, “Frame” and “Foot” parameters creating new ones or using those already present in the Revit “Material Browser”.

img

Now view the 3D Bim model and set the Realistic display style.

img

As can be seen, each element of the Revit family has been associated with a "Materials and Finishes" type Parameter and a different material can be associated to each of these.

Therefore, the possibility of choosing the materials of the Chair Furniture object controlled by the Revit family parameters is satisfied.


Discover our chairs and tables' 3D models:

https://www.syncronia.com/it/download-modelli-3d-modelli-bim-sedie-e-tavoli


Marco Mignatti

Co-founder Syncronia.com

Tutorial