Acoustic panels
Description Acoustic doors and panels with quality surface materials, semi-finished or finished.
Acoustic panels
Acoustic Doors
Description
Page being updated, design files will be available in some time.
Metal coating
Planium - AC02 Stick-on wall
Description
AC02 Stick-on is a coating with metal finishes and quick setting with glue, executable on any vertical surface suitable for gluing.
Metal floors
Planium - AC01 Stick-on floor
Description
AC01 Stick-on is a floor with metal finishes, available in different sizes and textures, which can be applied with glue.
Acoustic panels
Tailor-made products
Description
The Phonotamburato module is a sound-absorbing and sound-insulating panel that can be applied to furniture elements in indoor environments that need noise abatement.
Acoustic panels
Phonotamburato for Partition walls
Description
Acoustic cladding panel for partition walls, ideal for acoustic comfort for example in workplaces.
Acoustic panels
Phonotamburato for False Ceiling
Description
Acoustic panels for false ceilings, for large areas such as airports and shopping centres.
Acoustic panels
Phonotamburato for Panels
Description
Ceiling-hung, sound-insulating and sound-absorbing acoustic panels.
Acoustic panels
Phonotamburato for Doors
Description
Soundproof acoustic doors thanks to Phonotamburato panels.
Acoustic panels
Phonotamburato. The Material
Description
Phonotamburato® is a sound-absorbing and sound-insulating panel that allows sound absorption and sound insulation of rooms, ensur
Low tables
Mirto Indoor
Description
The metal structures have been made the new pewter painted finish .
Chairs
Jens
Description
For the Jens chair, with armrests in two versions and without armrests, the choice of wood in oak or natural wenge offers different shade variants.
Chairs
Gio
Description
Teak chair with antique grey finish, can be combined with the table from the same series
Chairs
Belle
Description
Wooden chair with rounded lines and padded seat with leather upholstery.
TUTORIAL 4: Revit family – introduction to the nested family
Introduction guide to the concept of the nested family applied to a set of furniture objects
Nested family
In this tutorial we will start to introduce the concept of the nested family by uniting various furniture objects into a single parametric family, which as a performance output has a numeric variable in the number of objects of the same.
We are talking about the classic table example, with three, four or more chairs, but the concept can easily be applied to many other examples.
Remember that the creation of BIM objects, commonly called families in Revit is fundamental to complete the 3D BIM models and for their correct functioning.
BIM Objects are commonly searched on the Internet to be inserted in a Revit design environment as Family without being modified in any way and often ignore its fundamental characteristics, how they have been created, the parameters use, the objectives they must meet, and their potential for interaction with the 3D model under construction.
Unlike a ".dwg" file from Autocad, or a ".ifc" file, an ".rfa" file (Revit's BIM families are ".rfa" files, Revit's BIM projects are files ". rvt ") when a "BIM Family"object is inserted into a 3D Parametric Model of the project, the latter is enriched with all the information contained in the inserted object, which can therefore be interrogated, modified, accounted for, etc.
Whether they are interior design objects such as chairs, tables, armchairs, and sofas, or real Architectural models such as doors, windows, textures, and coatings, etc. Therefore, we need to understand the characteristics to better take advantage of the potential and integration with the main BIM model that will host them.
The numeric variable of the nested family
The nested family is a fundamental aspect in creating particularly complex objects.
BIM offers the possibility of enriching a project with multiple information, but this complexity to operate correctly without being redundant must be managed correctly: the Revit family must therefore be built according to specific rules to guarantee the final performance assigned.
One of the systems that underlie the construction of a complex Revit Family, is the concept of nesting (inserting), one or more families within another in order to simultaneously control the parameters and, thus, the final performances.
As always, the best thing is to exemplify, so we will dedicate this tutorial to the creation of a funiture piece, consisting of a table with chairs that as a functional output has the possibility of varying the seating number.
We will start by downloading two .rfa that have already been crated, or rather, one table and one chair.
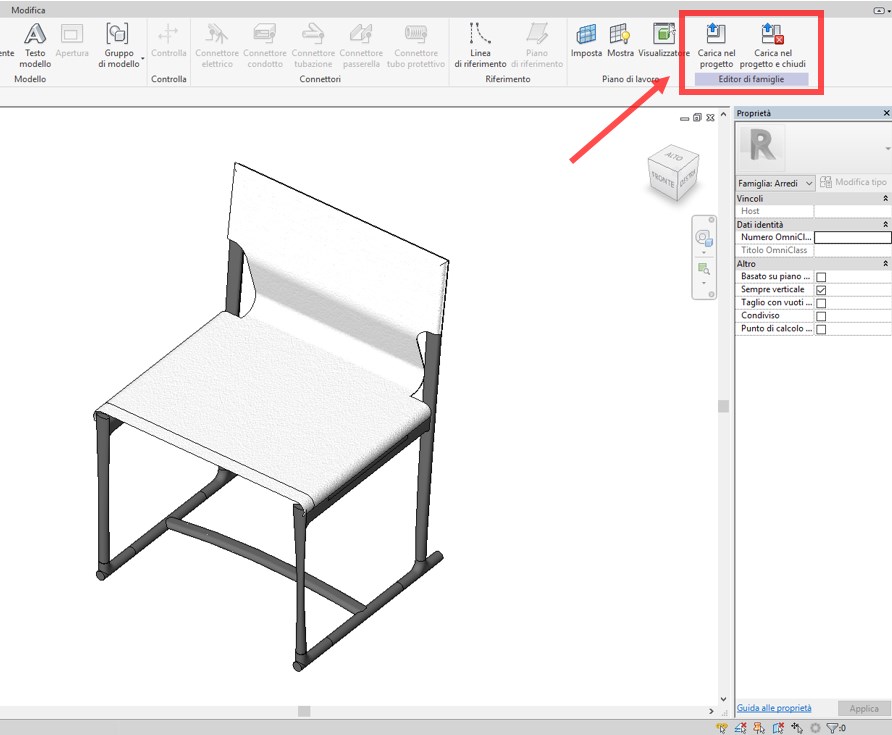
Revit – nested family – numeric variable 1
Let's open the two files at the same time and upload the IM58.rfa chair inside the T160.rfa table simply by selecting the first one and typing the command "load in the project" or "load in the project and close" if you want to close this family.
Place the chair inside the table view and switch to plan view.
The chair family is now nested inside the table family; therefore, in order to have a new family that is different from both of the native families, we will specifically save and rename it.
We align the chair to the table as if it were the first of a series of chairs that must be positioned around it.
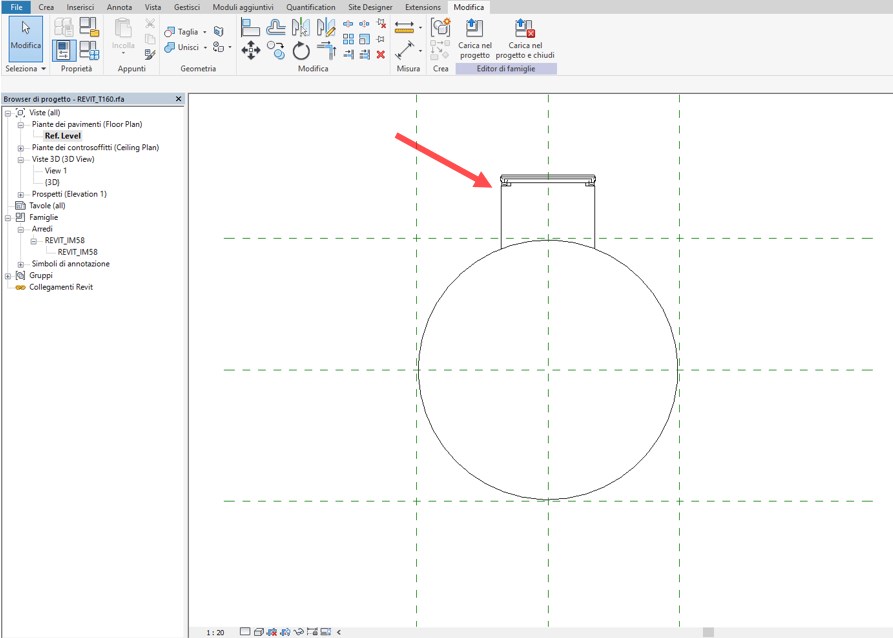
Revit – nested family – numeric variable 2
Now, we need to copy the chair in rotary motion around the center of the table, but the variable (parameter) that we have to insert is precisely the number of chairs we want to allocate to our furniture solution, therefore:
- We will use the “Matrix” command from the Edit tab;
- We will select “Radial” (since the repetition of the object must be circular);
- We will keep “Group and associate” marked;
- We will select “Last”;
- We will position the centre of the rotation in correspondence to the table (intersection of the main plans);
- We will type 360 in “Angle” and Send.
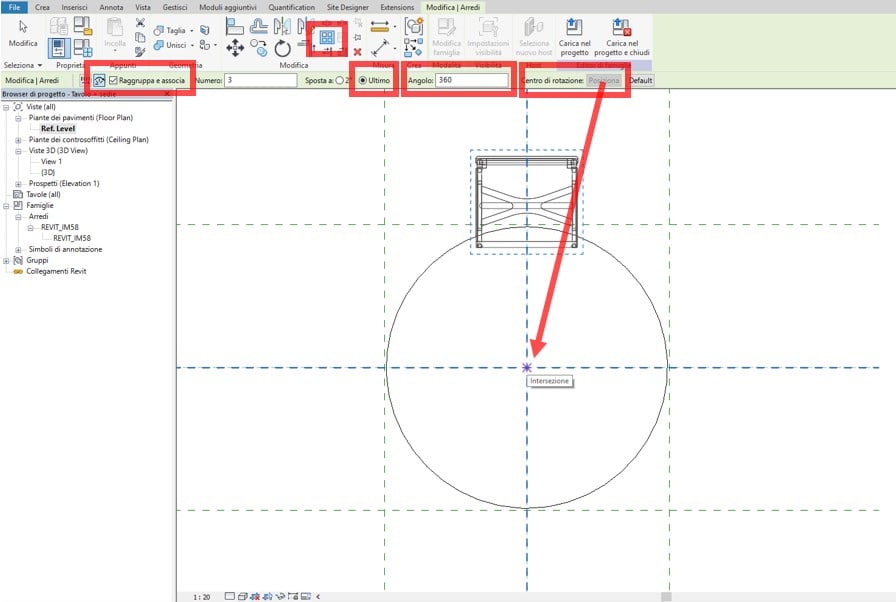
Revit – nested family – numeric variable 3
This generates a radial matrix of the chair object in the 3 elements (given by default), which is displayed both inside the active function bar and along the generation line of the chair object copy path.

Revit – nested family – numeric variable 4
Leaving the open command, changing the number on the path we will change the number of chairs that generates the matrix around the table. We can say that the matrix command functions as a parametric grouping since it contains the already prepared numeric variable.
So, let’s try to increase the number of seats from 3 to 5.
We see that the matrix works properly.
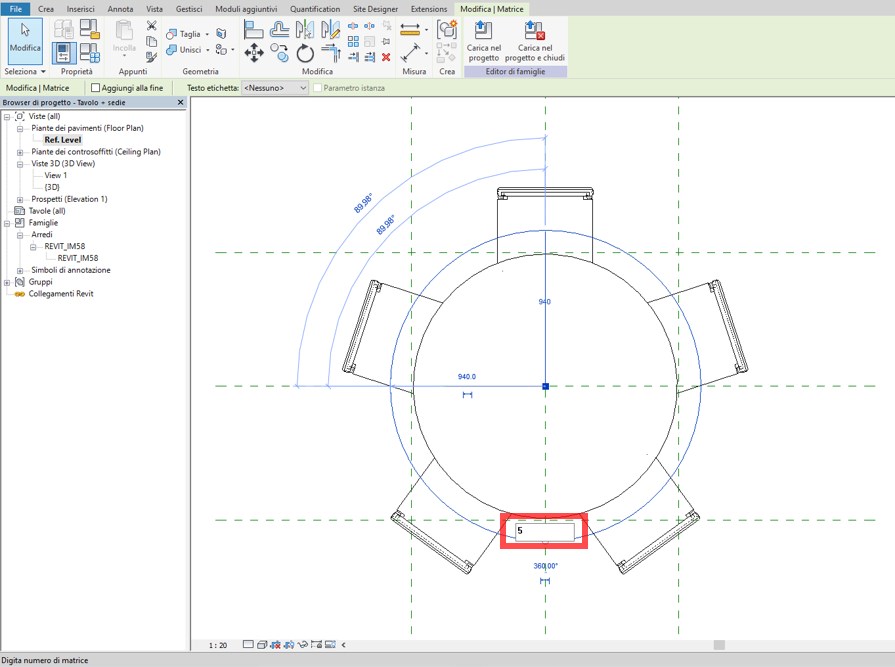
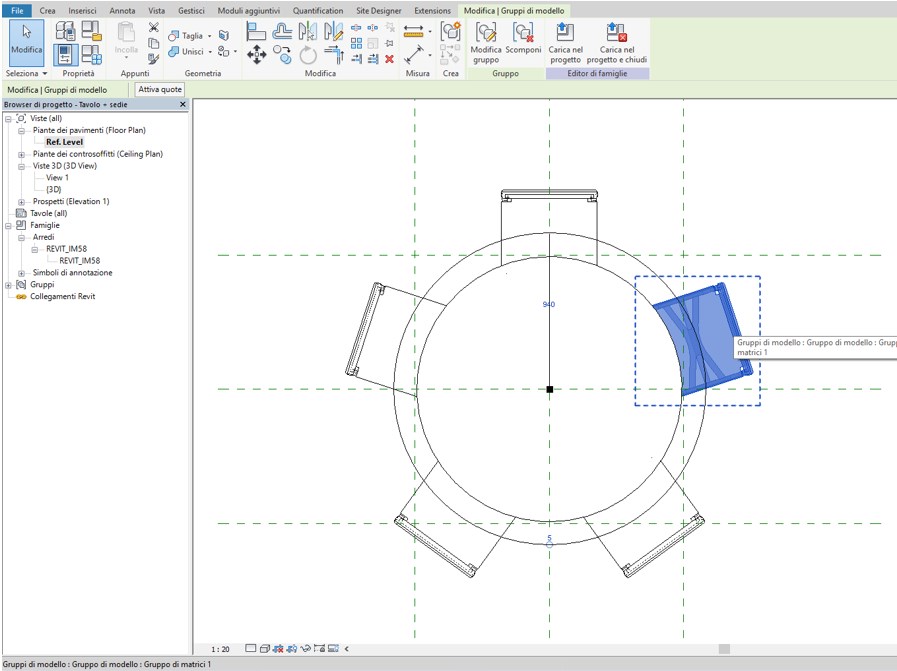
Revit – nested family – numeric variable 5
We need to explain another detail.
The chairs generated are part of a graphical parametric grouping (Matrix) and its behavior will be subject to the Matrix guidelines as long as it remains within this grouping. Therefore, this must not be modified.
This is graphically highlighted by selecting a single chair, which in addition to becoming blue will appear surrounded by a dotted line.
Revit – nested family – numeric variable 5
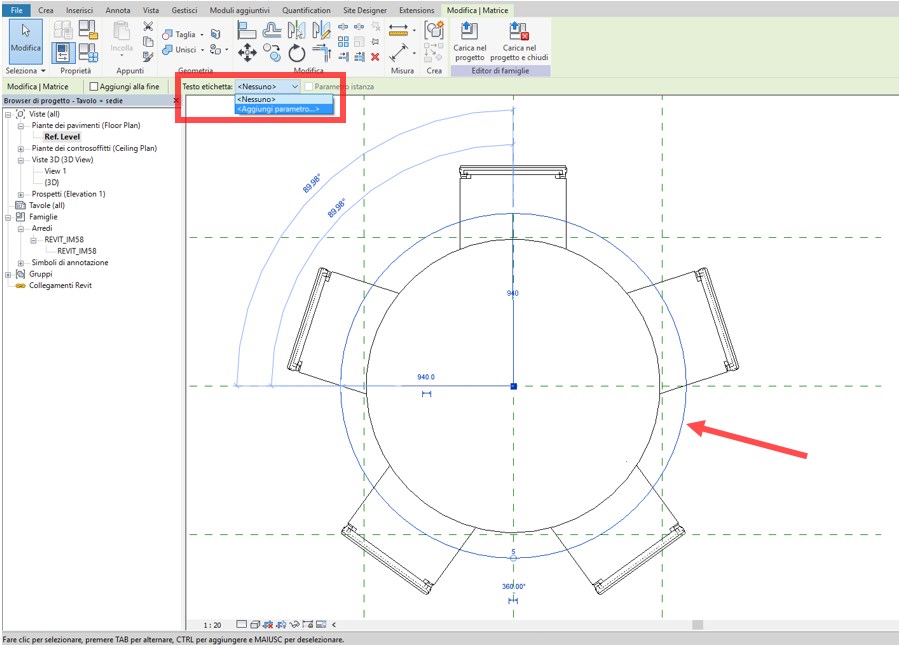
Now we must link the inherent property of the array command to generate a numeric variable of the objects to a parameter that will govern its operation (it will tell you how many chairs it will generate) and which must appear among the "Table + chairs" family properties.
The procedure is very simple and very similar to what we have seen previously for the creation of a new parameter:
- We will select the matrix path;
- We will select “Add parameter” from the “Label text” drop-down menu
Revit – nested family – numeric variable 6
In the properties tab that appears, type the name of the new parameter, which we will call "Number of chairs".
We note that the fields "Discipline" but above all "Type of parameter" can not be changed, this is because the only variable that can be associated with the Matrix is an integer number.
In this specific case, it is important to select "Instance". This will allow us, as we will see later, to change the number of chairs in our family within a project environment, without having to access the type properties.

Revit – nexted family – numeric variable 6
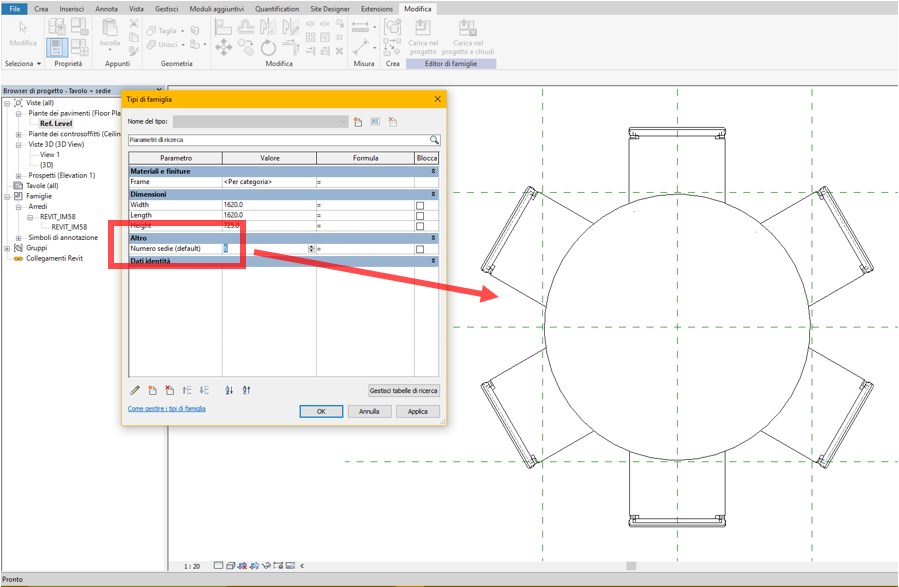
We can now verify that the new parameter "Number of chairs" has been generated and that it works correctly:
- We access the “Family Type” menu from the “Properties” tab;
- We check that the new parameter is correctly grouped in “Other”;
- We try to change the number, for example from 5 to 6;
The association applied between the parameter and the matrix is correct, the performance output of the predetermined family is achieved.
Revit – nested family – numeric variable 7
In conclusion, we try to insert our family within a design environment.
We select it and note that the parameter "Number of chairs" appears in the property bar.
As said before, having generated this parameter as “Instance”, this is can now be immediately changed without entering the type properties.
We will now try to change the number of seats, for example from 6 to 4 and let's see the result.

Everything works correctly.
Technical staff Syncronia
Tutorial
/sites/default/files/styles/article_teasers_1/public/2018-07/imm_1_0.jpg
Home decor and furnishing accessories
LA ROSA
Description
Design by: LPWK and Emma Silvestris, 2008.
The Rose, symbol of femininity, grace and love, is transformed here into a little perforated stainless steel fruit holder.
TUTORIAL 1: Creating a 3D BIM furniture object with Revit.
Part 1
The creation of BIM Objects, commonly called families in Revit, is essential for the completion of 3D BIM models, and for their proper operation.
BIM Objects are commonly searched for on the Internet in order to be included in a Revit design environment as Families without being modified in any way, and we often ignore the fundamental features, how they were made, the parameters used, the purposes they must fulfil, and the potential interaction with the 3D Model in construction.
Differently from what happens with a “.dwg” file in Autocad, or a “.ifc”, “.rfa” (Revit BIM Families are ".rfa", Revit BIM Projects are ".rvt" files) when a "Bim Family" object is added to a project Parametric 3D Model, the latter is enriched with all the information contained within the inserted object that can, therefore, be interrogated, edited, accounted for, etc.
They are interior design objects, such as Chairs, tables, armchairs and sofas, or real Architectural models such as doors, windows, cladding etc. Therefore, we need to understand their features to better exploit the potential and integration with the main BIM model that hosts them.
This tutorial will show how to crate a Revit family and, in particular, a furniture 3D BIM object.
The easiest thing to do is start from one of the furniture Revit Families found on this website to understand how it was created.
Take, for example, a chair, and more precisely the "Solo S62" .rfa file https://www.syncronia.com/it/modelli-3d-bim-cad-sedie/bb-italia/solo
When opened, the "Chair" Furniture object file will look like this:
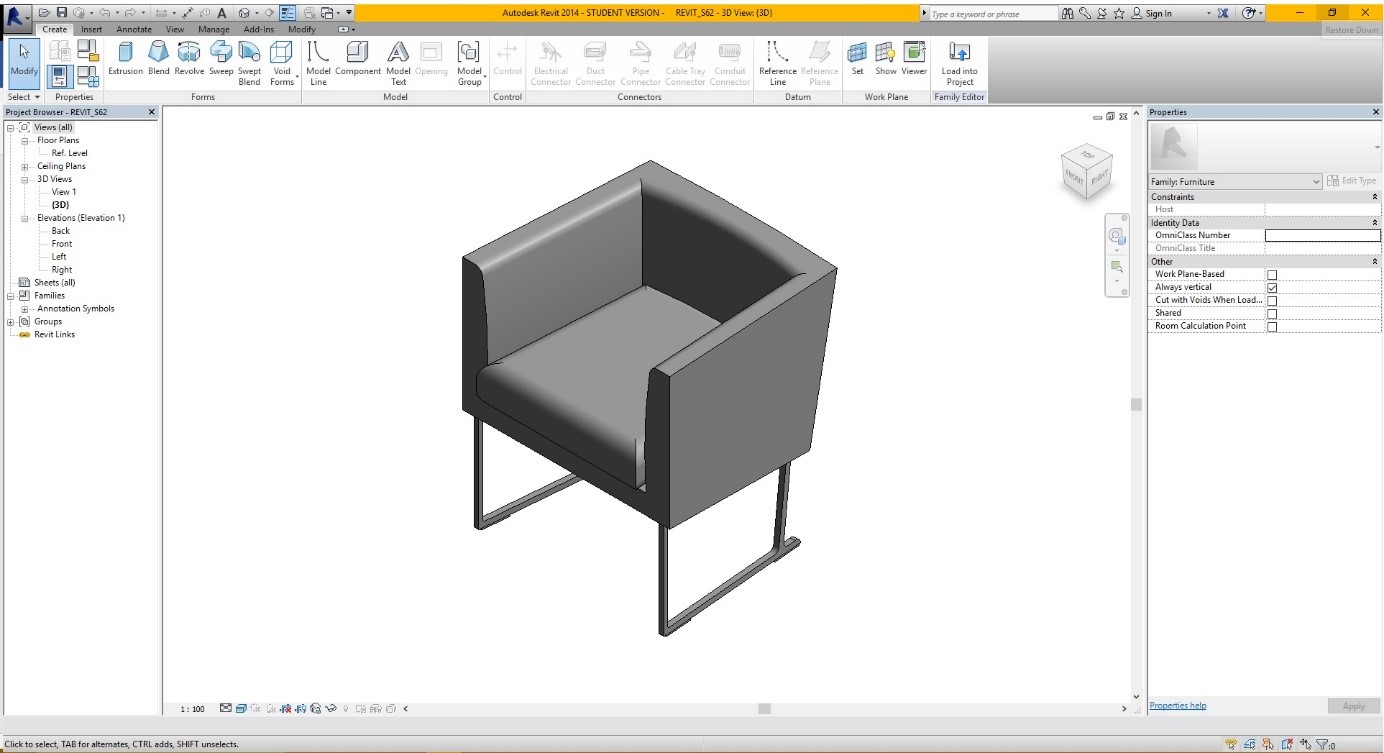
In addition to carrying out a completely graphic function, in this case of furniture, a Revit family has a series of information and functions that allow it to interact with the 3D model of the project that is intended to host it.
These information and functions are defined parameters and are the performance output of the family.
Each Revit Family will have specific parameters, the creation of which is much more complex than the realization of an Autocad Block.
If we take a Window or Door Frame as an example, you should have the opportunity to meet the Architectural solutions of the 3D BIM Project, but this will have to be designed to comply with such requests in the simplest way possible without having to be physically modified every time.
We need the parameters of a 3D BIM family for this purpose.
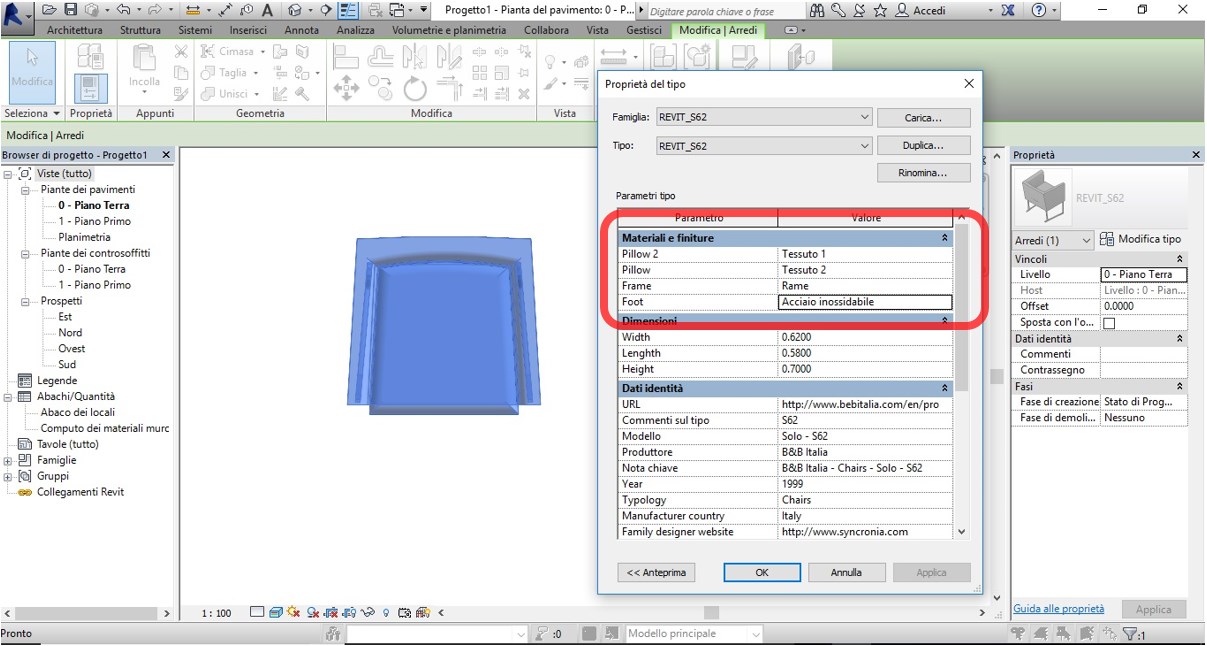
Now let's take a look at the family parameters of Furniture as an example. Simply click on Family Types of the Properties tab of the Create menu.
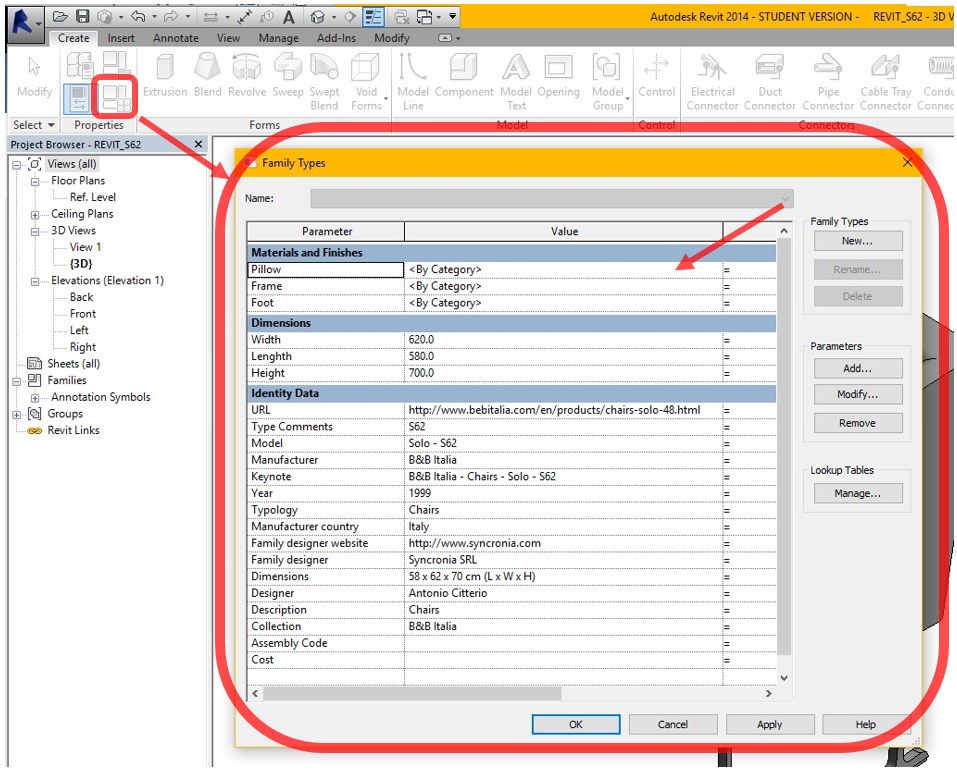
The "Family Types" menu that opens provides all information about the Furniture family parameters.
In this case, we see that there are three types of parameters:
- Materials and Finishes;
- Dimensions;
- Identity Data.
Within the first type we find the parameters of the Furniture BIM Family:
- Pillow;
- Frame;
- Foot.
It is important to note that the Revit Family used as an example is a piece of Furniture, a Chair, for which the manufacturer provides a fixed size and materials that can be chosen from the catalogue.
The choice of the materials of the Chair is the design variable, which is controlled by the Revit family parameters.
Each of these parameters has a value that, if well set, and once the family is hosted within the BIM project model, can be changed with the purpose, as said above, of assigning a custom material to the BIM Furniture object and, in particular, to the pillow, rather than to the frame or to the foot of the chair.
To check if this is sufficient, click on the reference value for "Pillow" for example and assign a different material than that set by default to the "Chair" Furniture object. This material can be selected from the “Material Browser” available.

Now, everything in the Revit family corresponding to the “Pillow” is associated with a different material, for example a glass.
Then, we check what part of the furniture object has changed appearance.
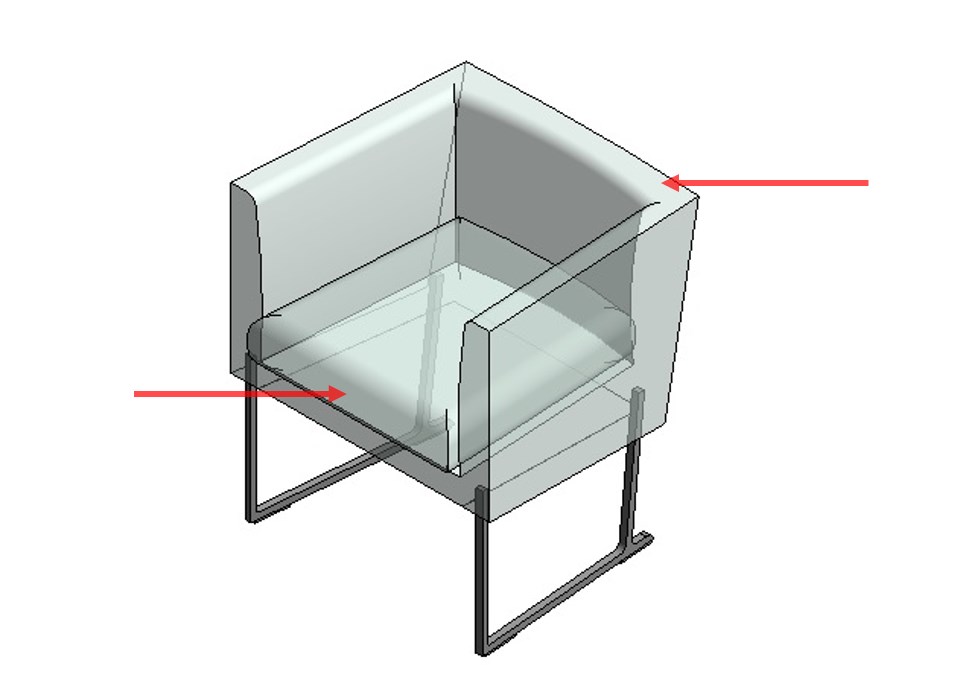
It can be noted that both the seat cushion and the backrest of the Furniture item have actually changed the material, it is used to indicate that both are associated with the parameter “Pillow”.
Now we will see how the "Materials and Finishes" parameters are associated to the various part of the Revit family in question.
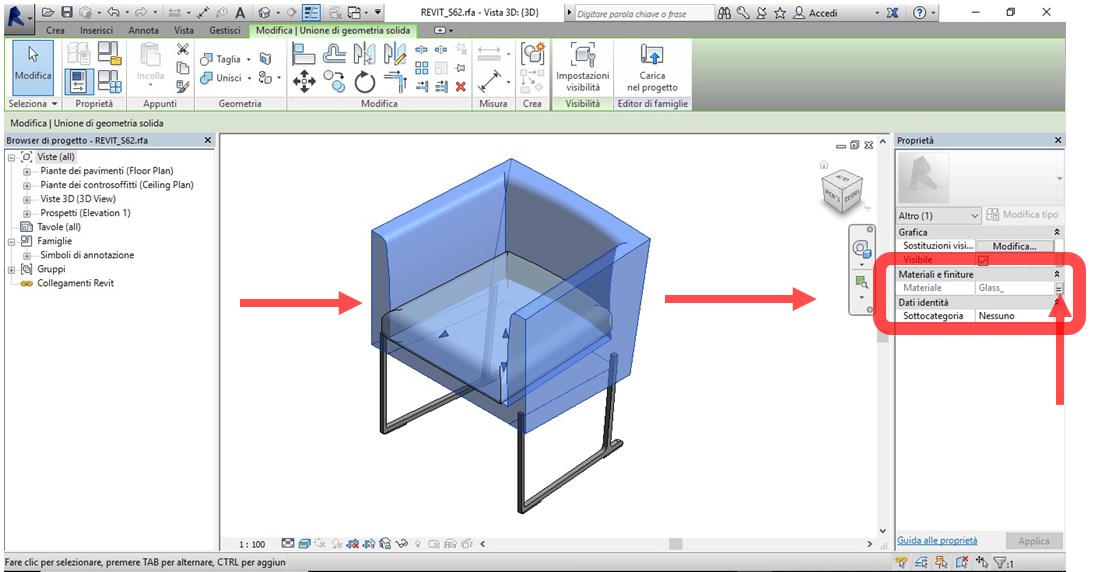
Selecting the chair backrest will activate the properties of the specific object, and in "Materials and Finishes" the "Glass" material is associated. Immediately to the right you will note a button.
This is the command to set the association of the material parameter to the geometric shape selected.
By selecting the button, you enter the association or creation menu of the material parameters of the Furniture BIM object taken as an example.
The parameter to which the furniture object geometry selected is associated, and we find the "Pillow" parameter of the "Materials and Finishes" type.
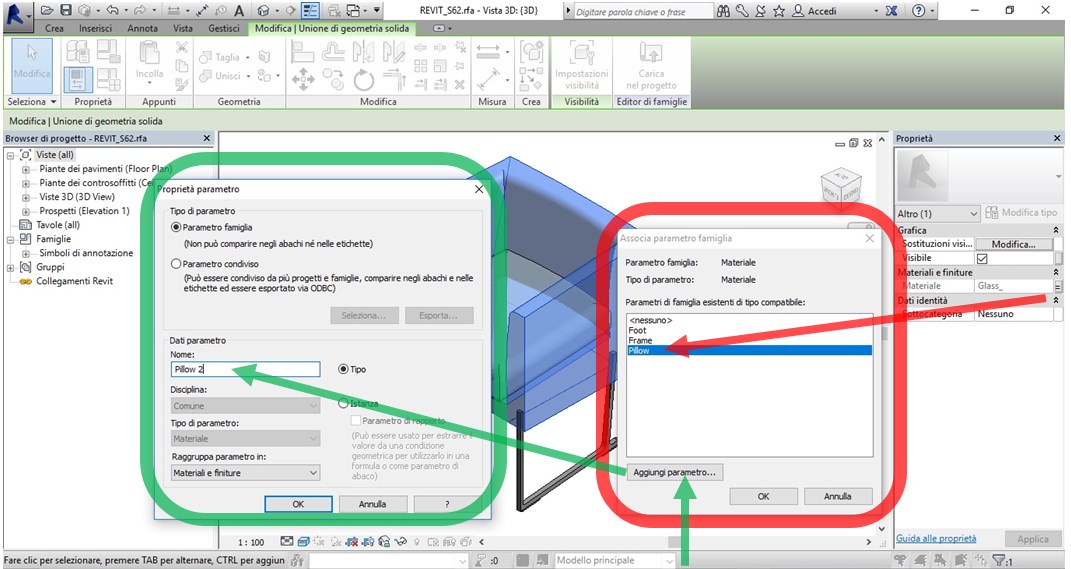
At this point, you can choose to associate the selection with another existing parameter (Foot or Frame), or create a new parameter, for the purpose of, for example, differentiating the material between the backrest and the seat of the Revit family.
To do this, select the "Add parameter" button and you will see the "Parameter Properties" menu in reference to the new parameter to create what we will call “Pillow 2”.
After the creation of the new parameter we check if the same appears among the family parameters. We go back and click on the Family Types of the Properties tab of the Create menu of the ".rfa" file.
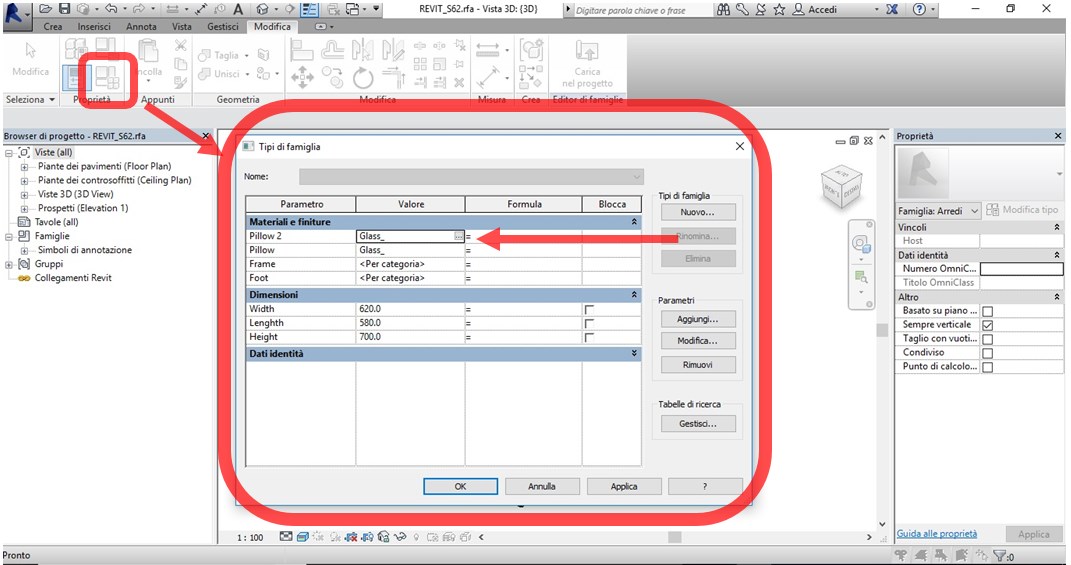
As you can see, the new parameter “Pillow 2” is now present and positioned correctly within the type of f “Materials and Finishes” of our Chair.
At the same, we can assign a new material in the same way.
To check that our BIM family works properly, we need to upload it to a Revit file project:
- Open a new project from the "R" drop-down menu and select "New"; "Project", "Architectural Model"

The new work environment presents itself as a blank floor plan.
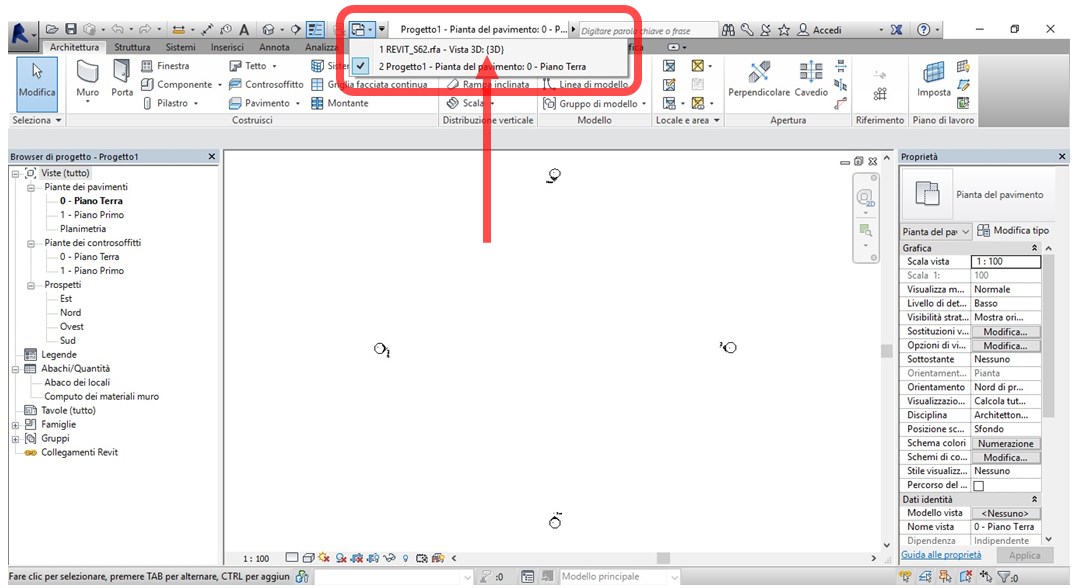
- From the "Switch windows" drop-down menu, return to the Revit family being created by selecting it from the open views.
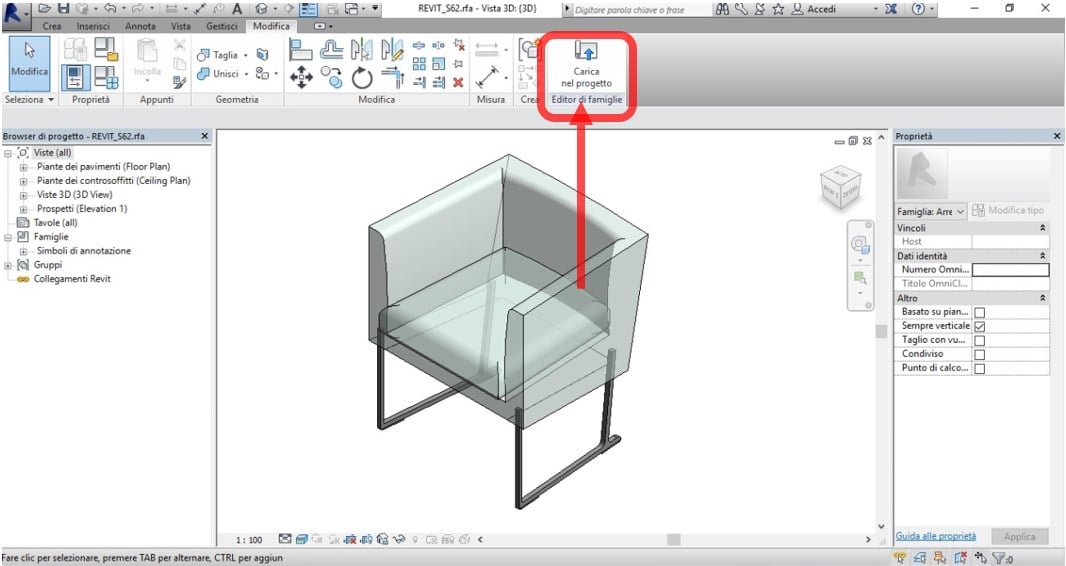
- Upload the chair furniture object in the project BIM model.
- Now we have the furniture BIM object within a Revit design environment, and we can check it simply by selecting it.
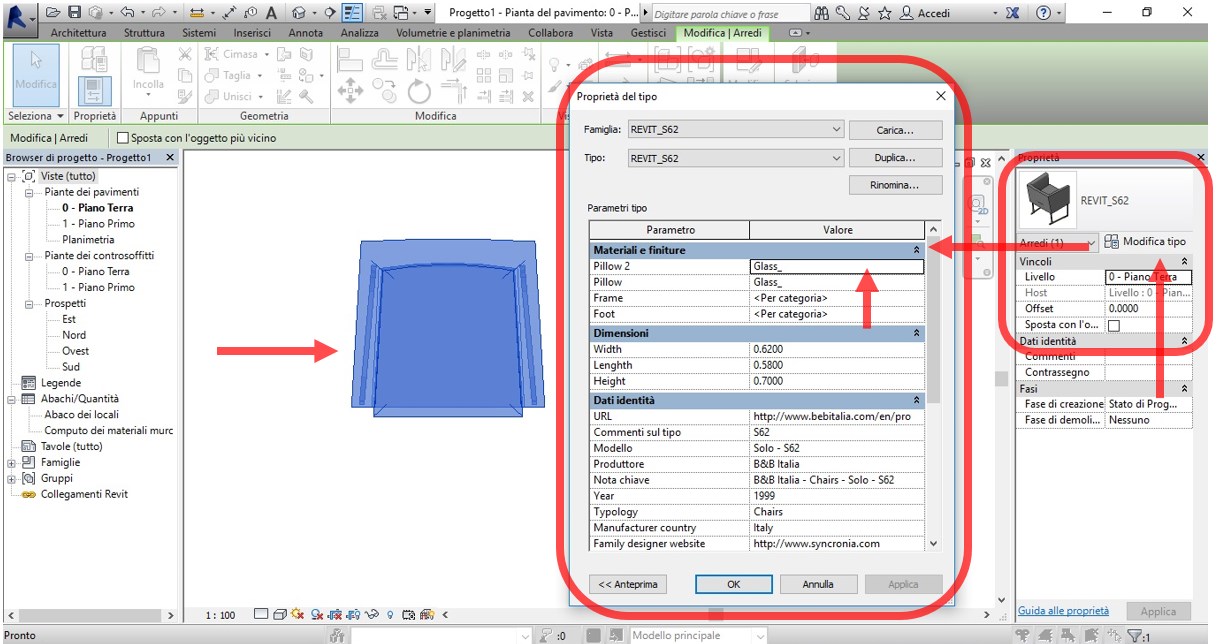
In the properties toolbar, select the “Edit type” and properties menu of the imported 3D family type opens.
As a test, replace the materials associated with parameters “Pillow”, “Pillow2”, “Frame” and “Foot” parameters creating new ones or using those already present in the Revit “Material Browser”.
Now view the 3D Bim model and set the Realistic display style.
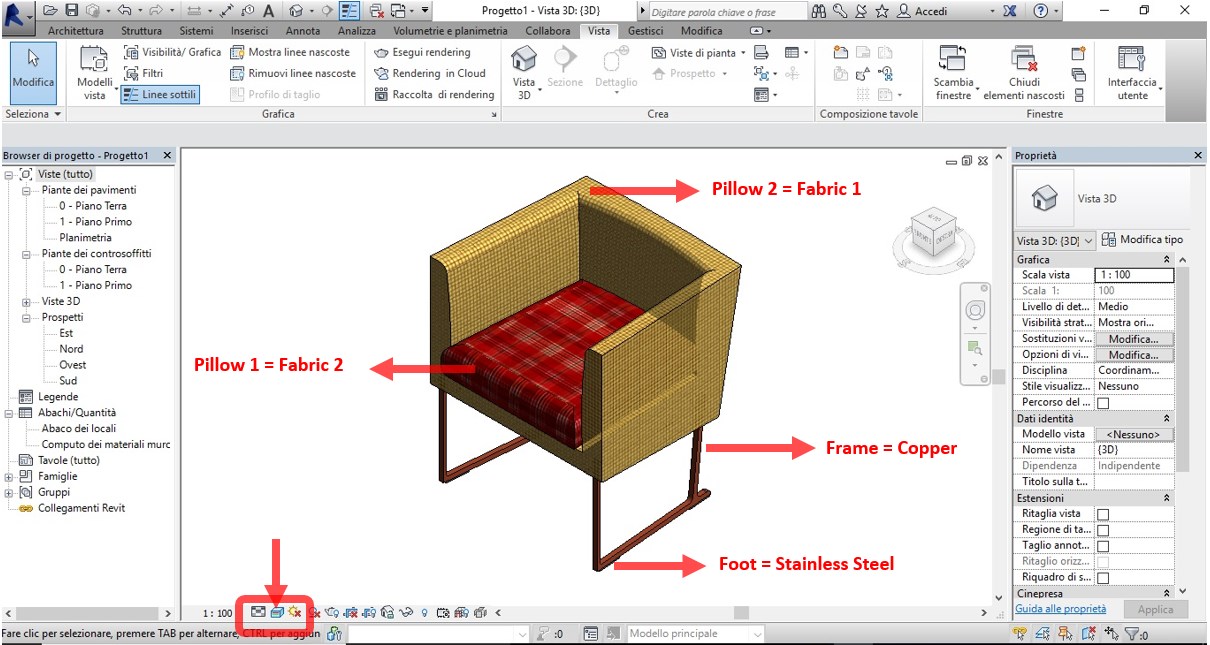
As can be seen, each element of the Revit family has been associated with a "Materials and Finishes" type Parameter and a different material can be associated to each of these.
Therefore, the possibility of choosing the materials of the Chair Furniture object controlled by the Revit family parameters is satisfied.
Discover our chairs and tables' 3D models:
https://www.syncronia.com/it/download-modelli-3d-modelli-bim-sedie-e-tavoli
Marco Mignatti
Co-founder Syncronia.com
Tutorial
/sites/default/files/styles/article_teasers_1/public/2018-03/13_1.jpg
Low tables
Bolt
Description
The new Bolt Table is designed by Mario Bellini for B&B Italia.
Kitchen furnitures
Seven Days
Description
Multifunctional kitchen with custom-made modular elements - Designed by C.R. & S. Riva 1920
Kitchen furnitures